Putting Your Website Online
summary
Once you have bought a domain name from a domain name registrar (registrar for short), created a website in Plesk, and filled it with content, it is time to put it online.
In this topic, you will learn how to put your website online if you bought your domain name from Hover (Enom), GoDaddy, NameCheap, Network Solutions, or IONOS. You will also learn how to put your website online using Amazon Route 53, DigitalOcean DNS, or Azure DNS, no matter who you bought your domain name from.
Getting your website up and running comes down to choosing your DNS configuration and then configuring DNS. Both tasks may seem intimidating at first. We will help you by describing configuration types and step-by-step procedures of configuring DNS.
You can choose from the following DNS configurations:
-
(Recommended) Using Plesk as the primary DNS Server.
If you go with this configuration, Plesk will create and manage your website DNS records automatically.
We will show you how to switch from the DNS services of the following registrars to Plesk:
-
Using the DNS service offered by your domain registrar.
You will need to create and manage your website DNS records manually on the DNS service portal of your domain registrar. We will show you how to put your website online and configure mail with the most popular registrars:
-
Using a third-party DNS service synced with Plesk, namely:
Using Plesk as the Primary DNS Server
To put your website online, you can use Plesk as the primary DNS service.
This DNS configuration is easy to set up. After you do so, Plesk will manage your website DNS records automatically.
The general procedure of setting up Plesk as the primary DNS server looks as follows:
Log in to the DNS service portal of your domain registrar.
-
Add the glue records for the nameservers. The glue records have the following pattern:
ns1.<domain_name>   <the Plesk server IP address>
ns2.<domain_name>   <the Plesk server IP address>
For example:
ns1.example.com   192.0.2.1
ns2.example.com   192.0.2.1
Change the nameservers of the domain registrar to those you added during the previous step (
ns1.<domain_name>andns2.<domain_name>).
We will now show you the exact procedures for the most popular top registrars.
Hover (Enom)
Log in to Plesk.
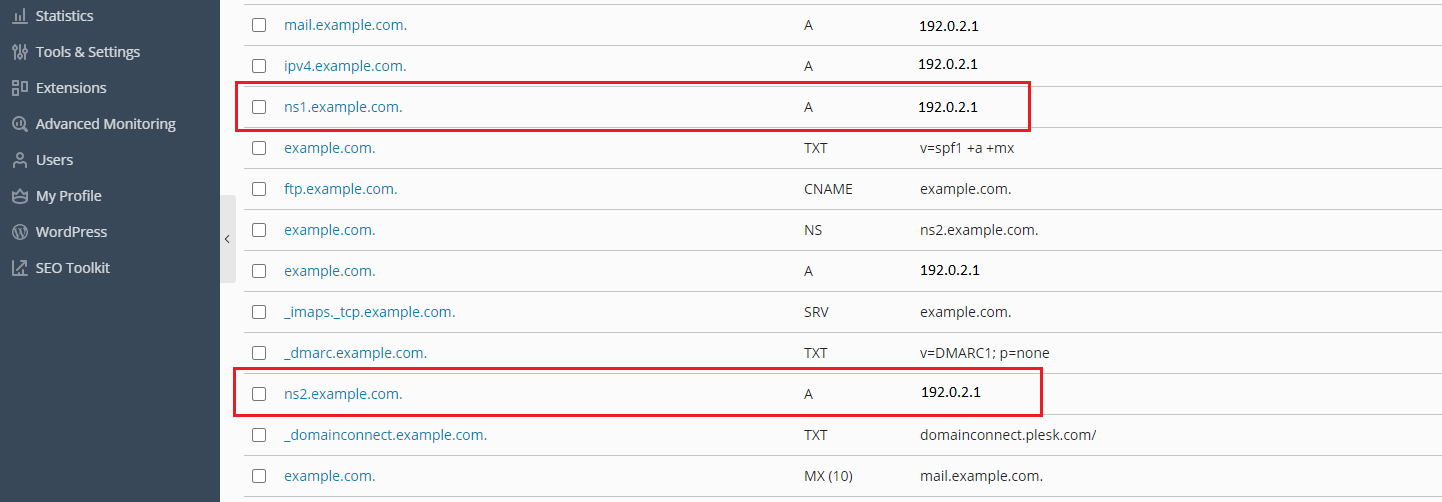
Go to Websites & Domains > your domain > the “Hosting & DNS” tab > DNS.
-
Locate two glue records. They have the following pattern:
ns1.<domain_name>   <the Plesk server IP address>
ns2.<domain_name>   <the Plesk server IP address>
Copy the NS records’ hostnames (
ns1.<domain_name>andns2.<domain_name>) and the server IP address. You will need them later.
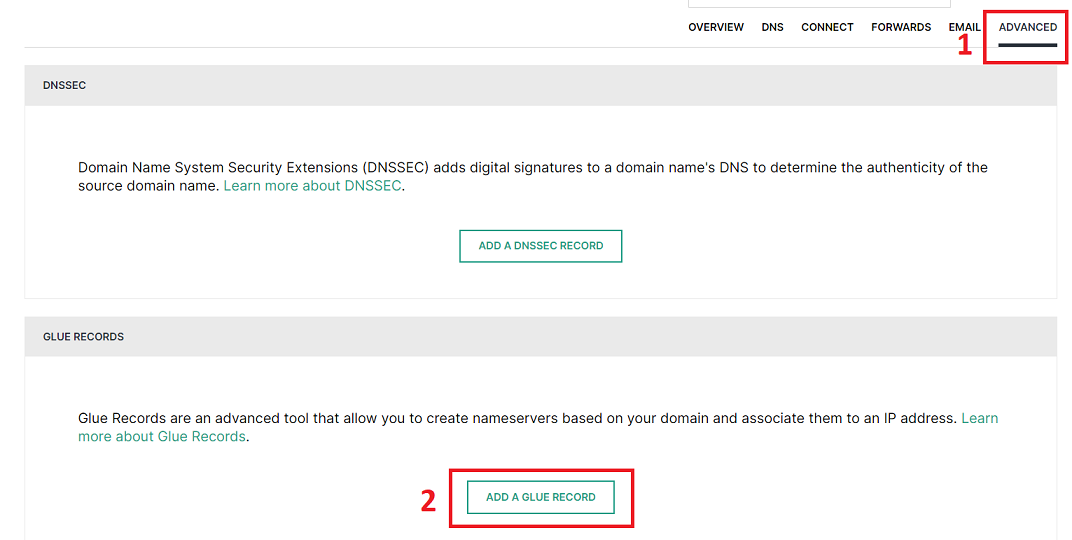
Make sure you are on the page of the domain for which you want to configure DNS hosting in Plesk.
-
Go to the “Advanced” tab and then click ADD A GLUE RECORD.
-
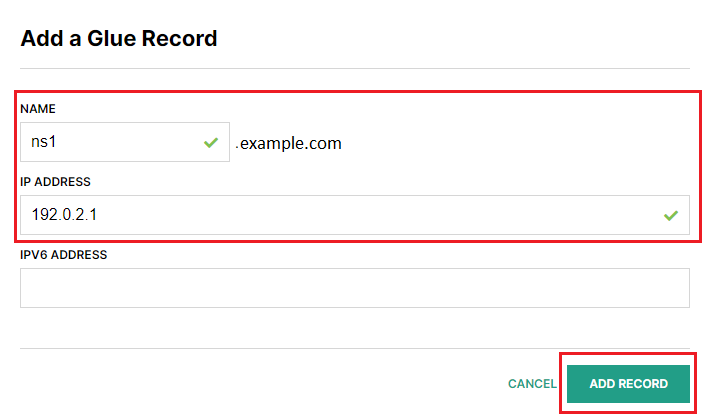
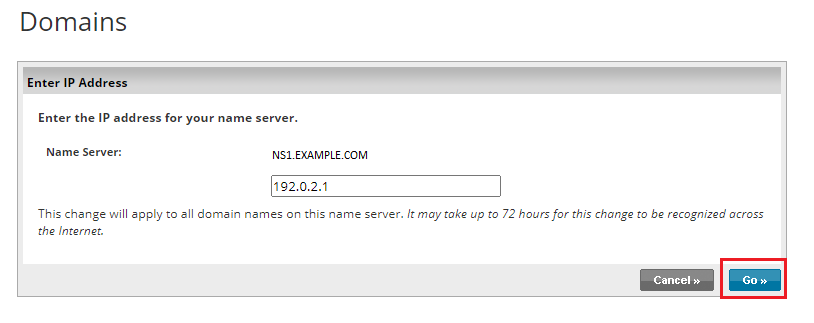
Add the first glue record. To do so, specify
ns1.<domain_name>, your Plesk IP address, and then click ADD RECORD. Add the second glue record. To do so, repeat the previous step but specify
ns2.<domain_name>.-
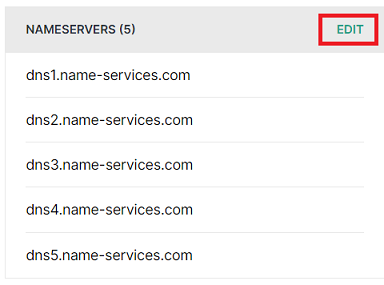
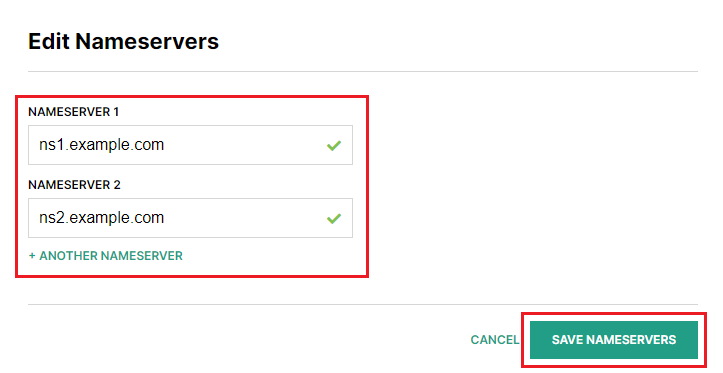
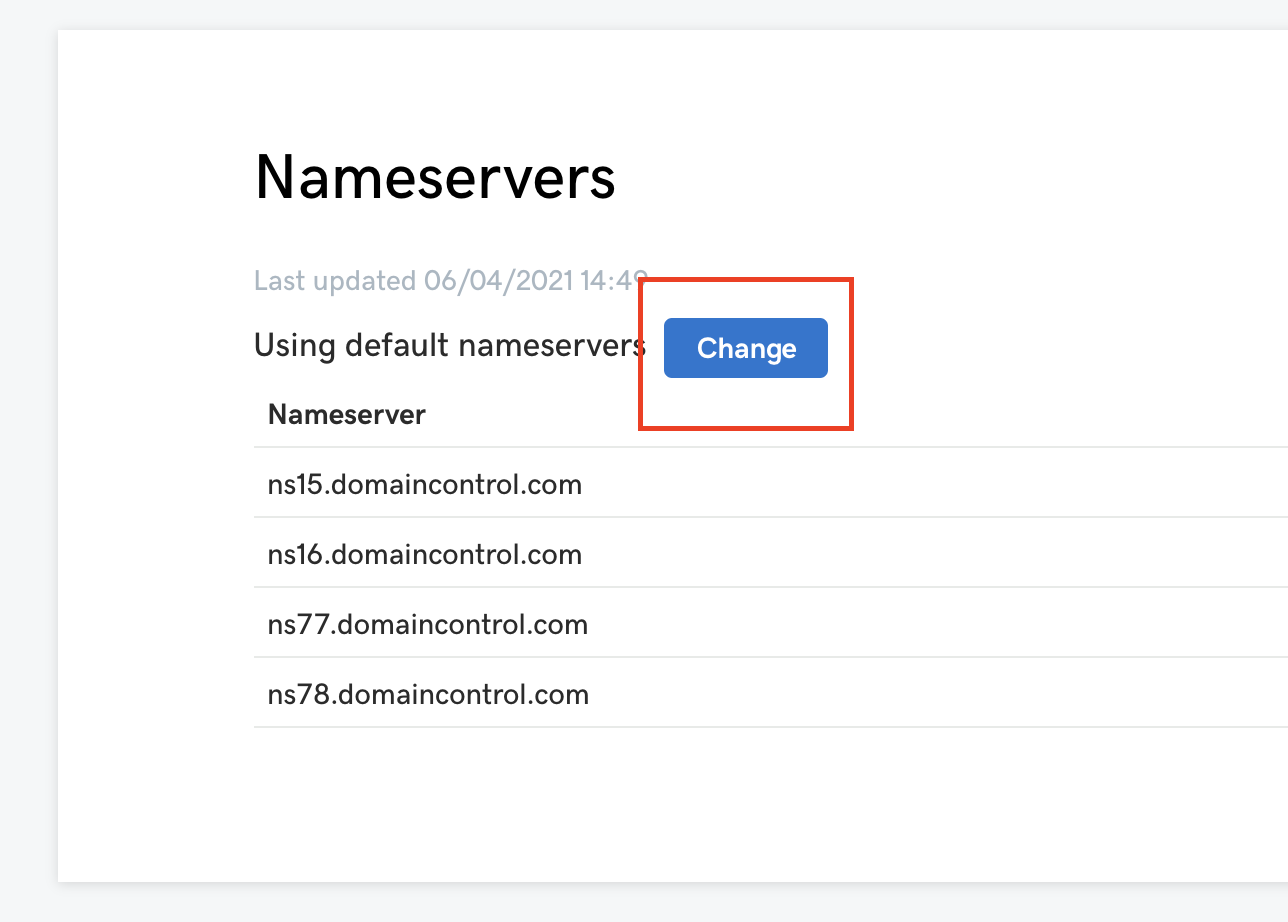
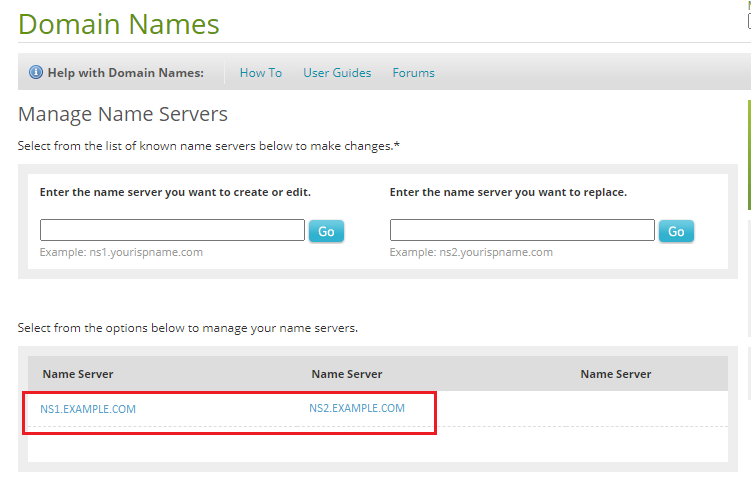
Go to the “Overview” tab, scroll down to the “NAMESERVERS” section on the left, and then click EDIT next to it.
-
Delete three nameservers and keep only the first two. As “NAMESERVER 1” and “NAMESERVER 2”, specify the nameservers you have created earlier (
ns1.<domain_name>andns2.<domain_name>), and then click SAVE NAMESERVERS.
You have finished configuring Plesk as the primary DNS server. Your website will be up and running once changes come into effect. Propagation can take up to 24 hours.
GoDaddy
Log in to Plesk.
Go to Websites & Domains > your domain > the “Hosting & DNS” tab > DNS.
-
Locate two glue records. They have the following pattern:
ns1.<domain_name>   <the Plesk server IP address>
ns2.<domain_name>   <the Plesk server IP address>
Copy the NS records’ hostnames (
ns1.<domain_name>andns2.<domain_name>) and the server IP address. You will need them later. Log in to GoDaddy Domain Manager.
-
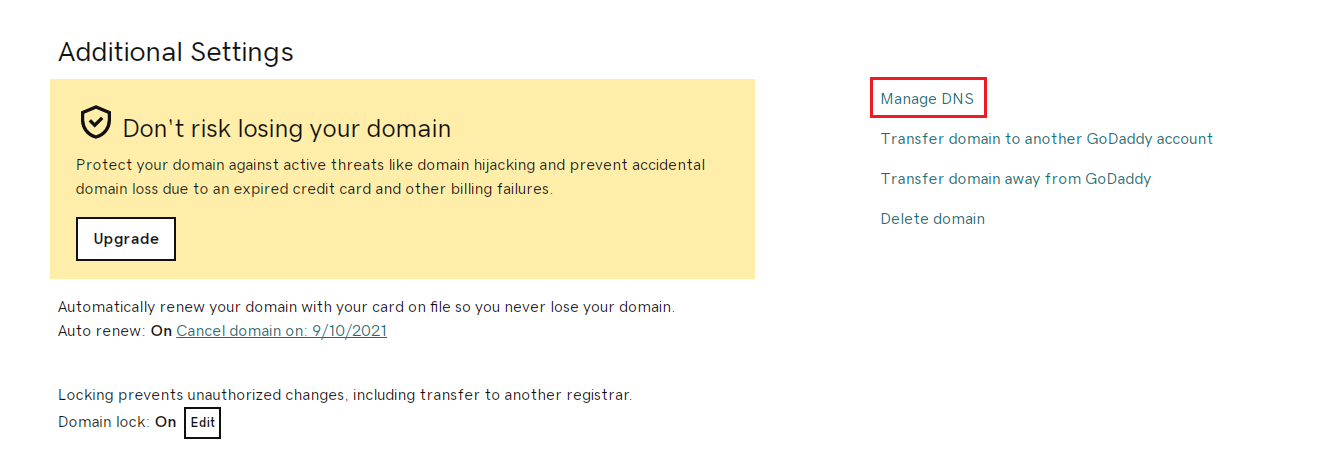
Click the domain name, scroll down to the “Additional Settings” section, and then click “Manage DNS” on the right.
-
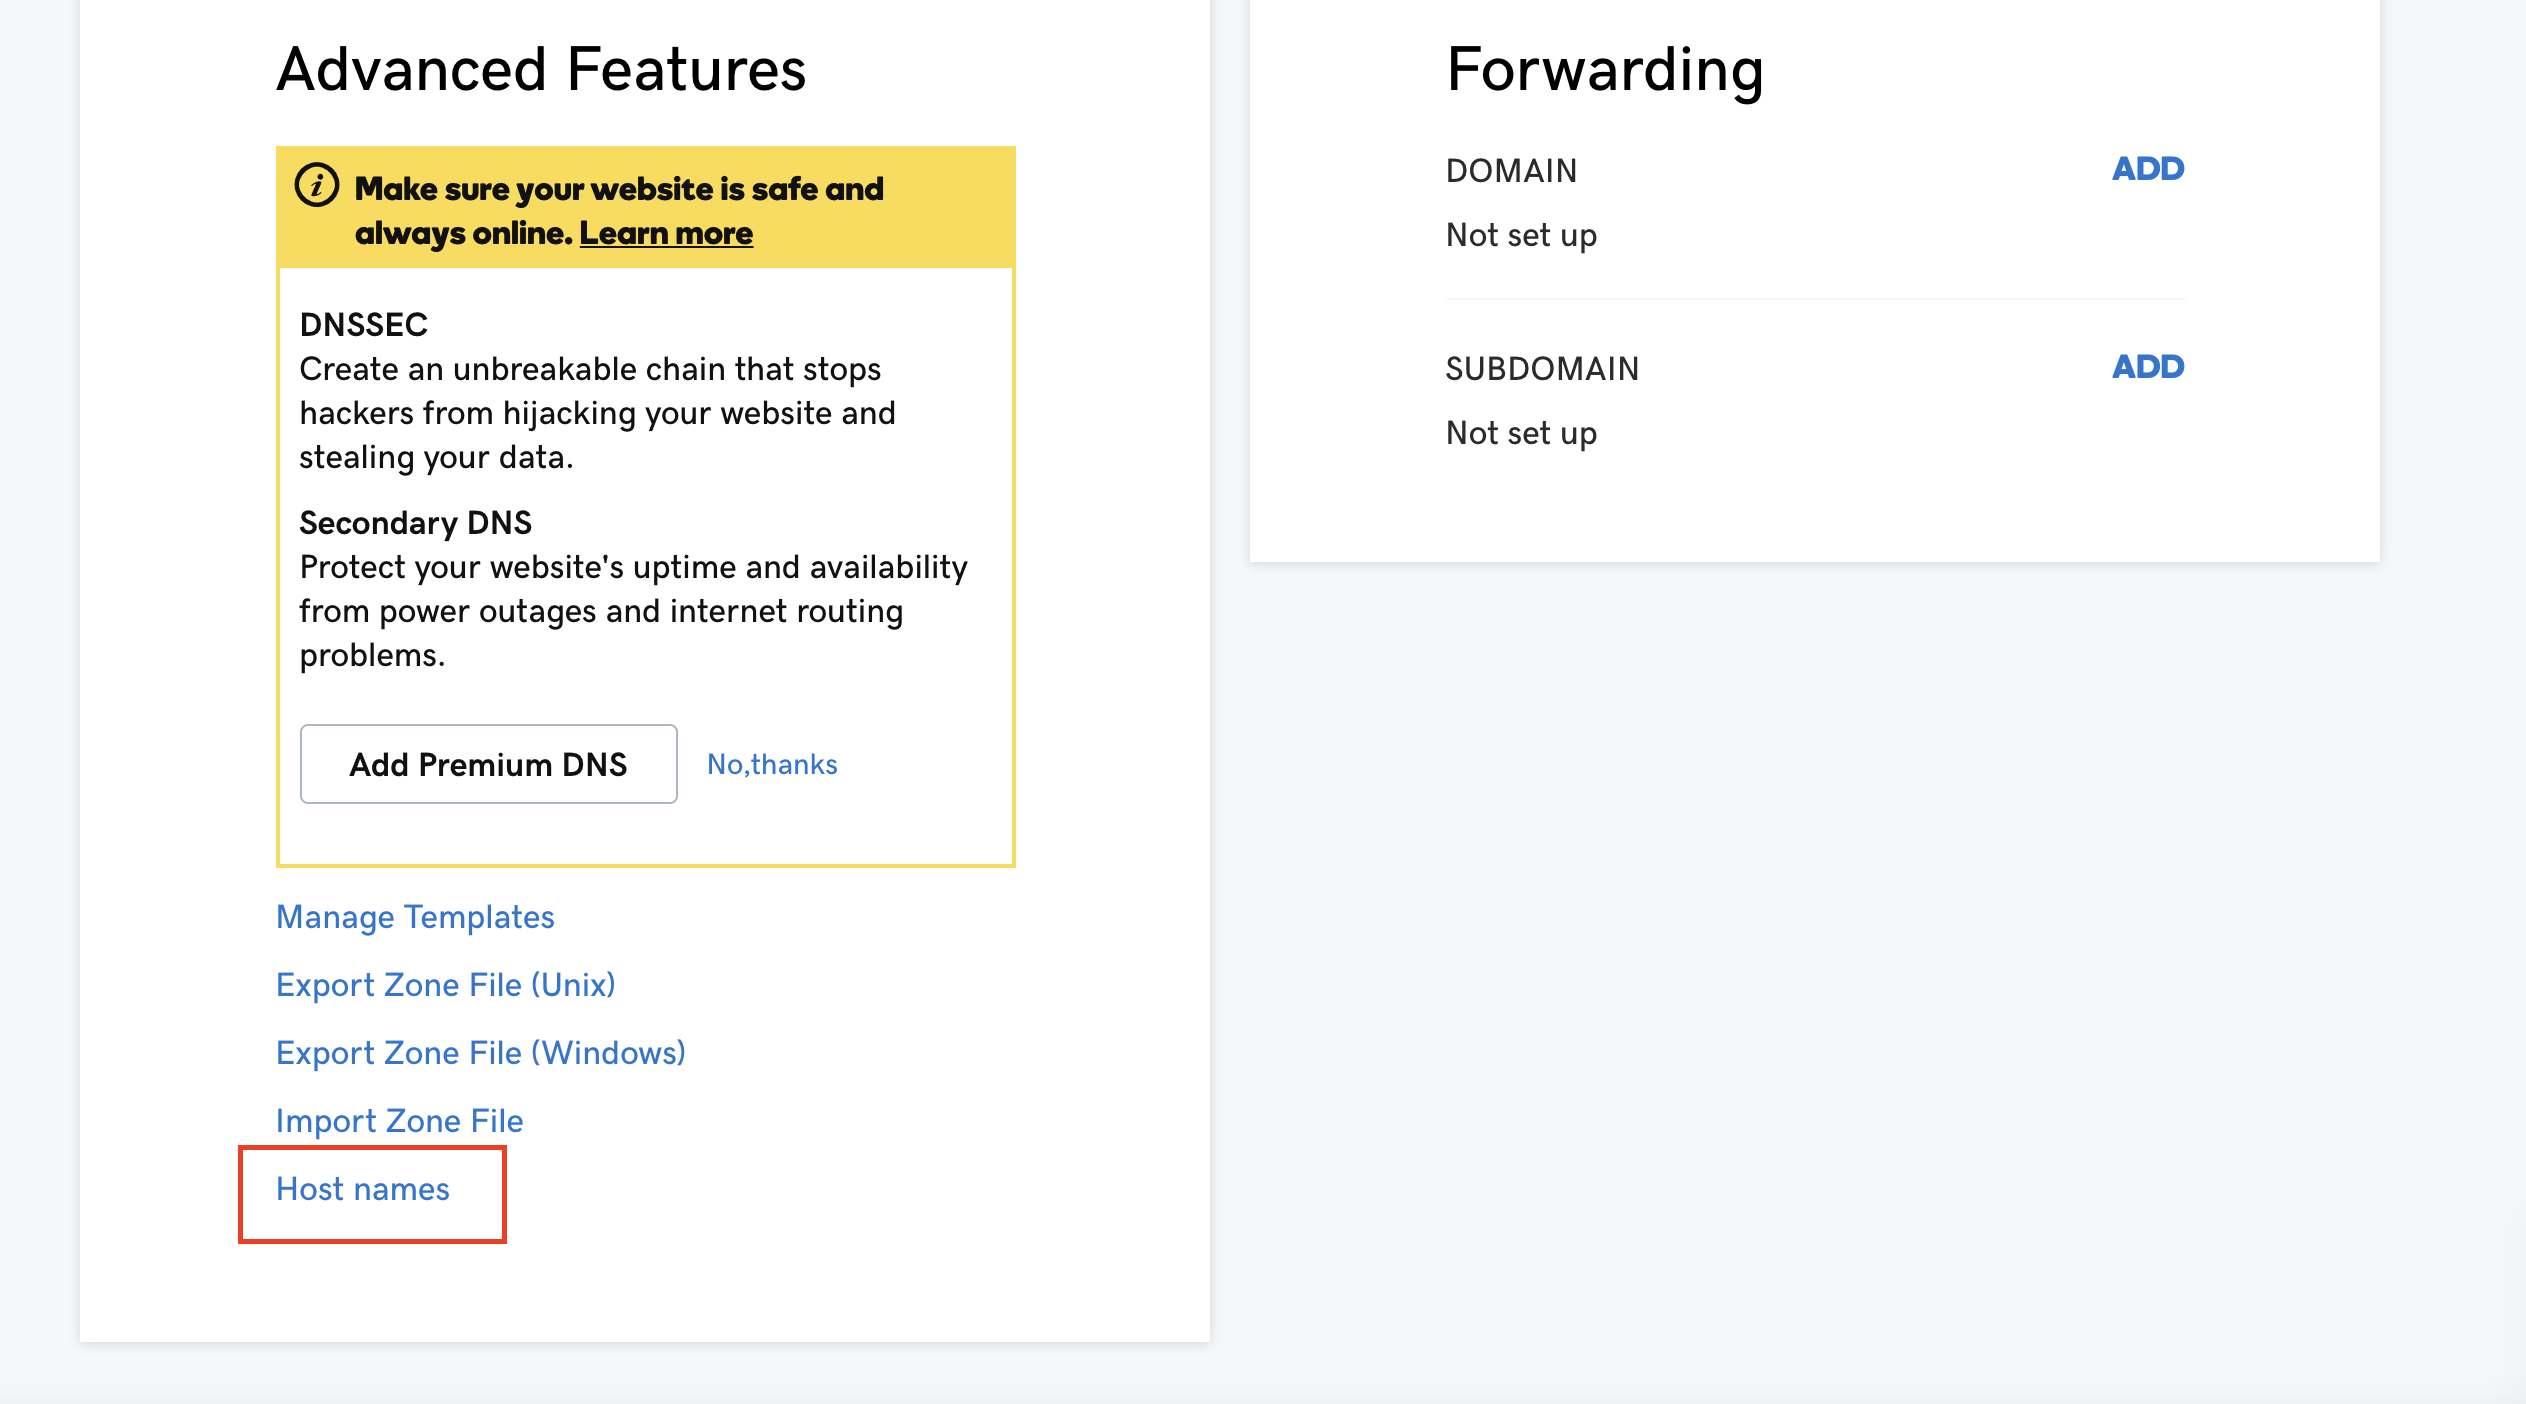
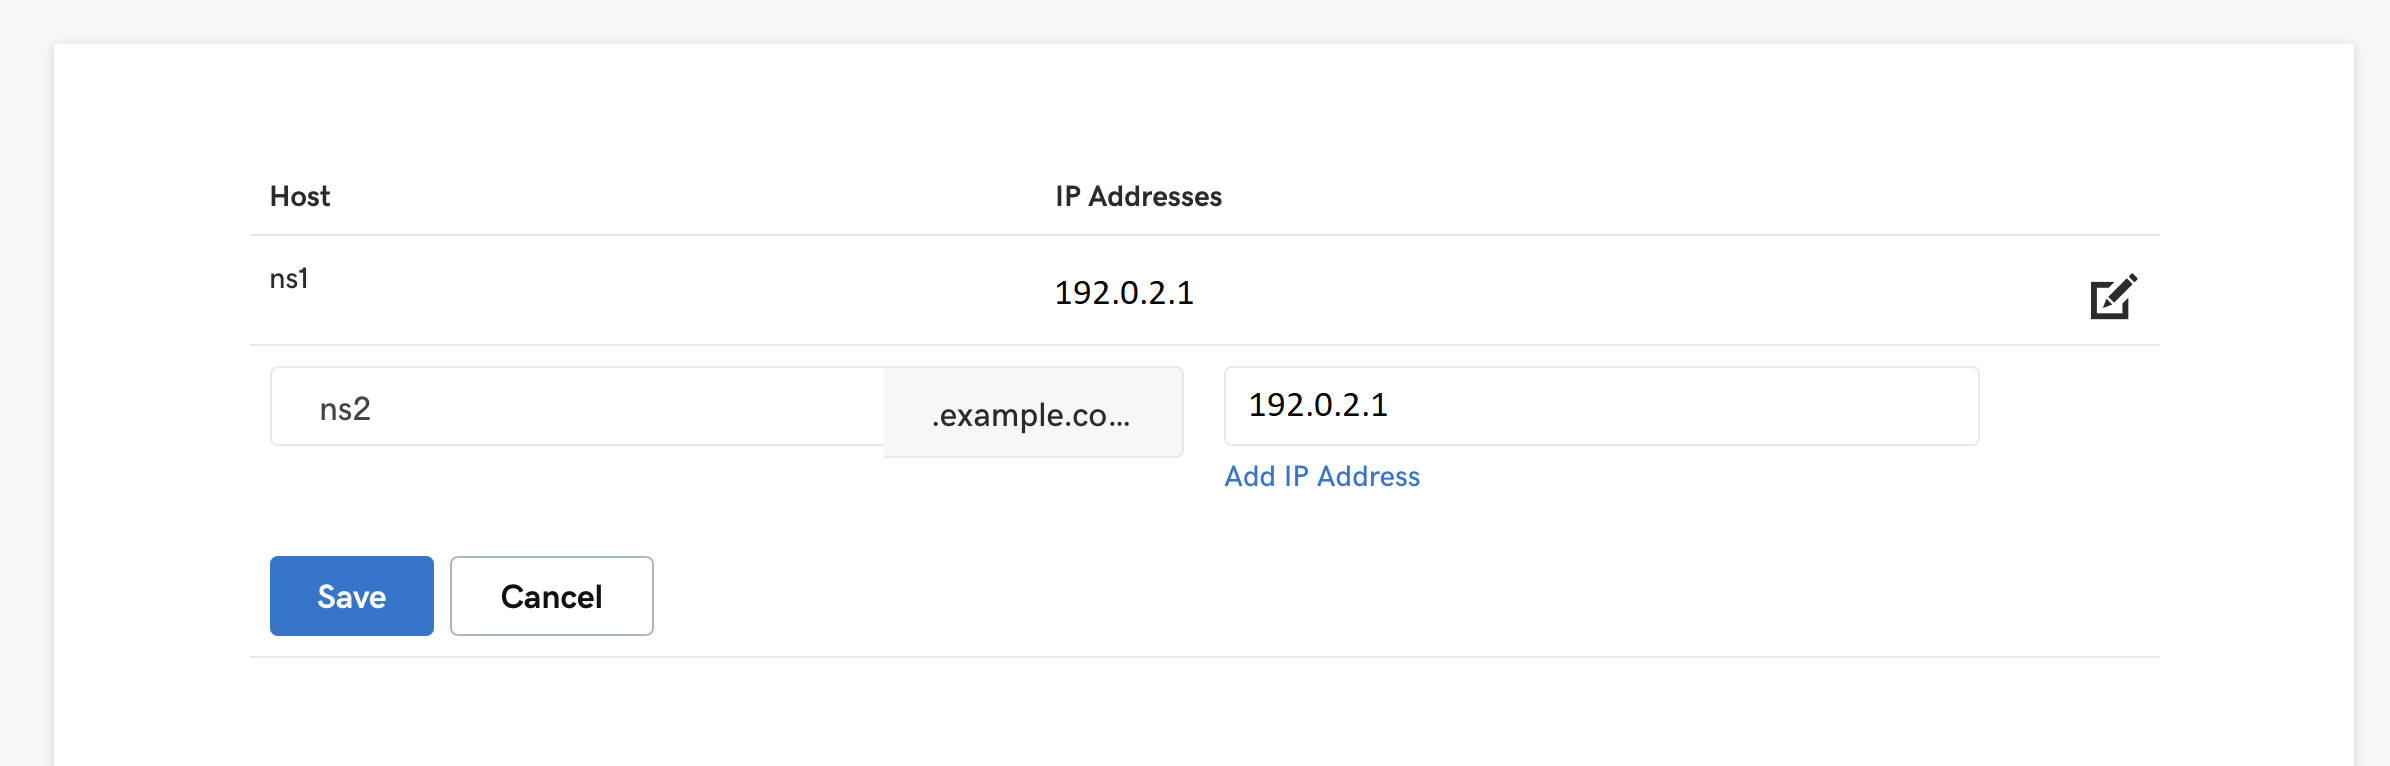
Scroll down to the “Advanced Features” section, click “Host names”, and then click ADD.
-
Add two glue records. To do so, specify
ns1.<domain_name>,ns2.<domain_name>, your Plesk IP address, and then click Save. -
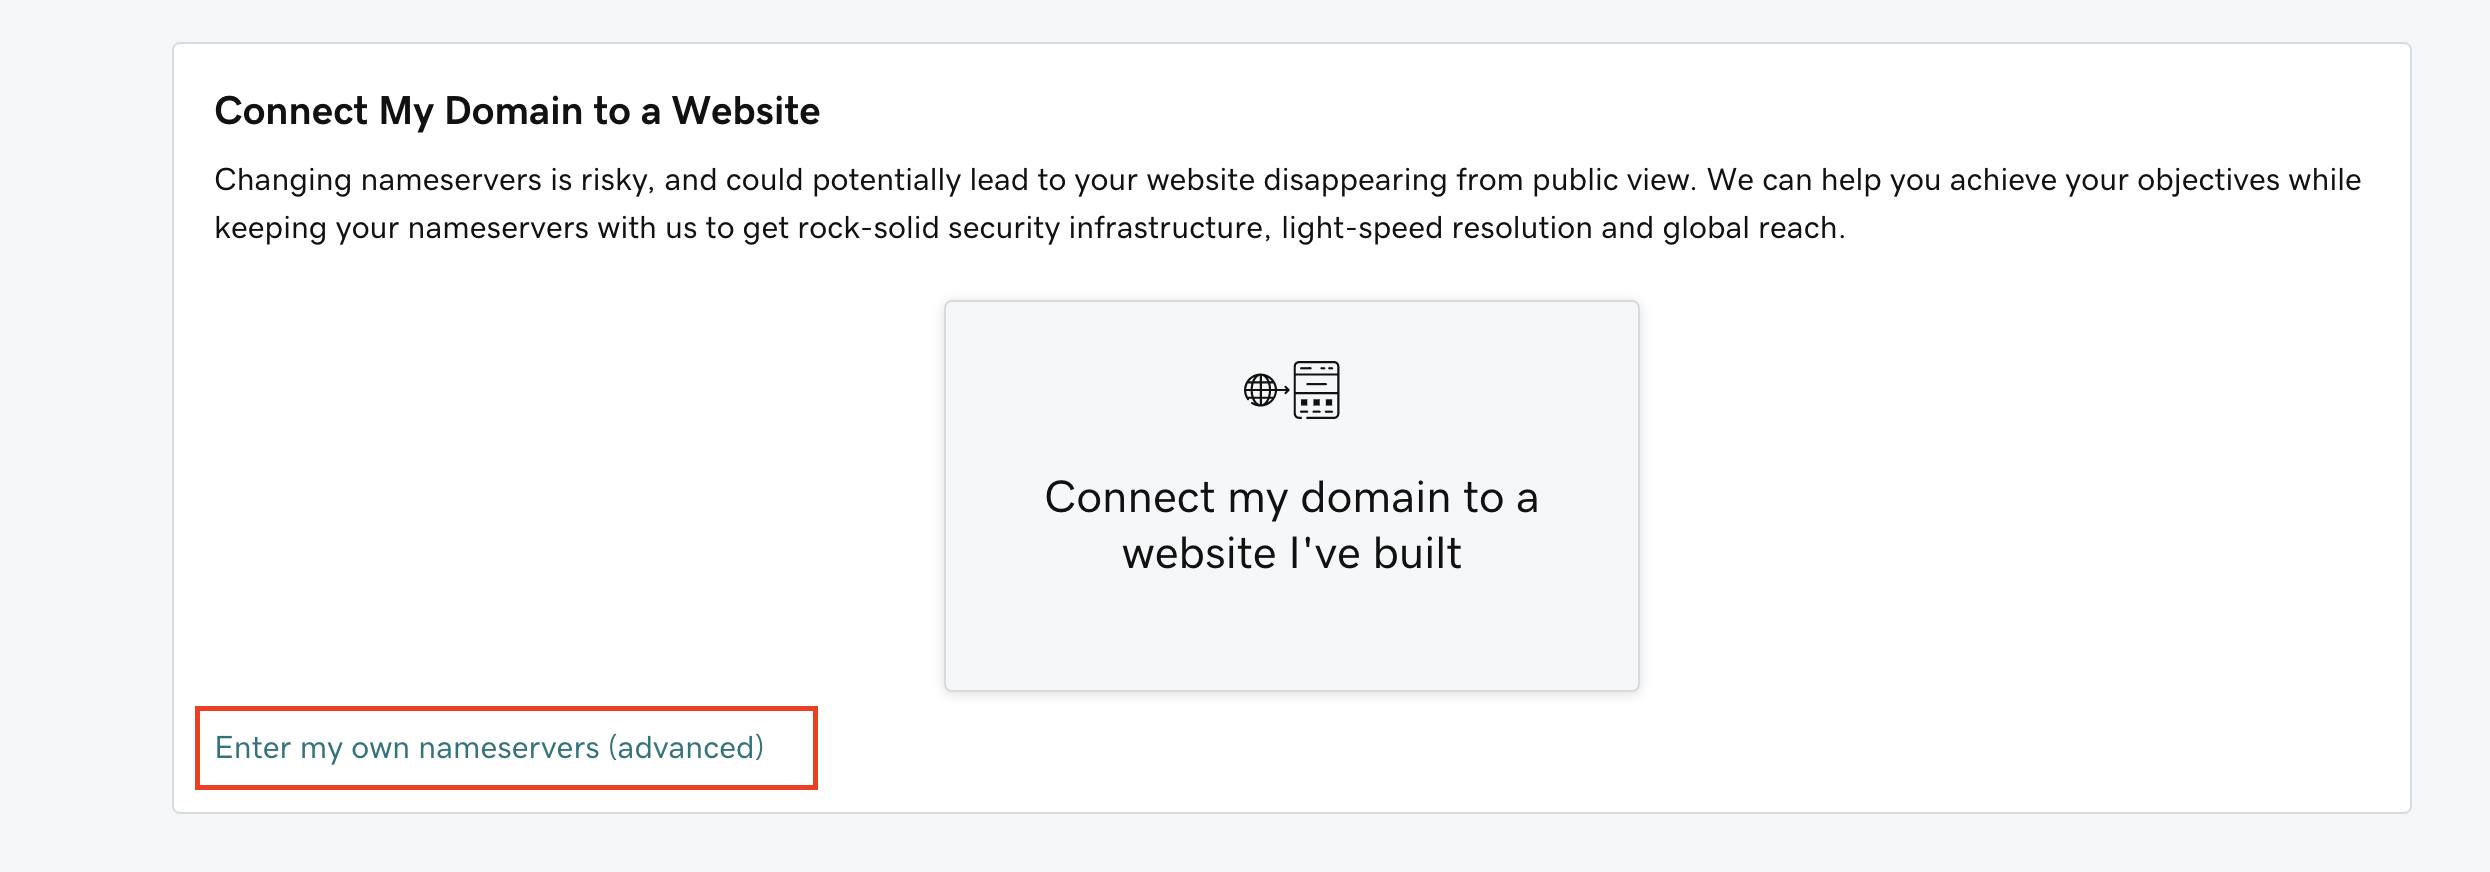
Next to “Nameservers”, click Change.
-
Click “Enter my own nameservers (advanced)”.
-
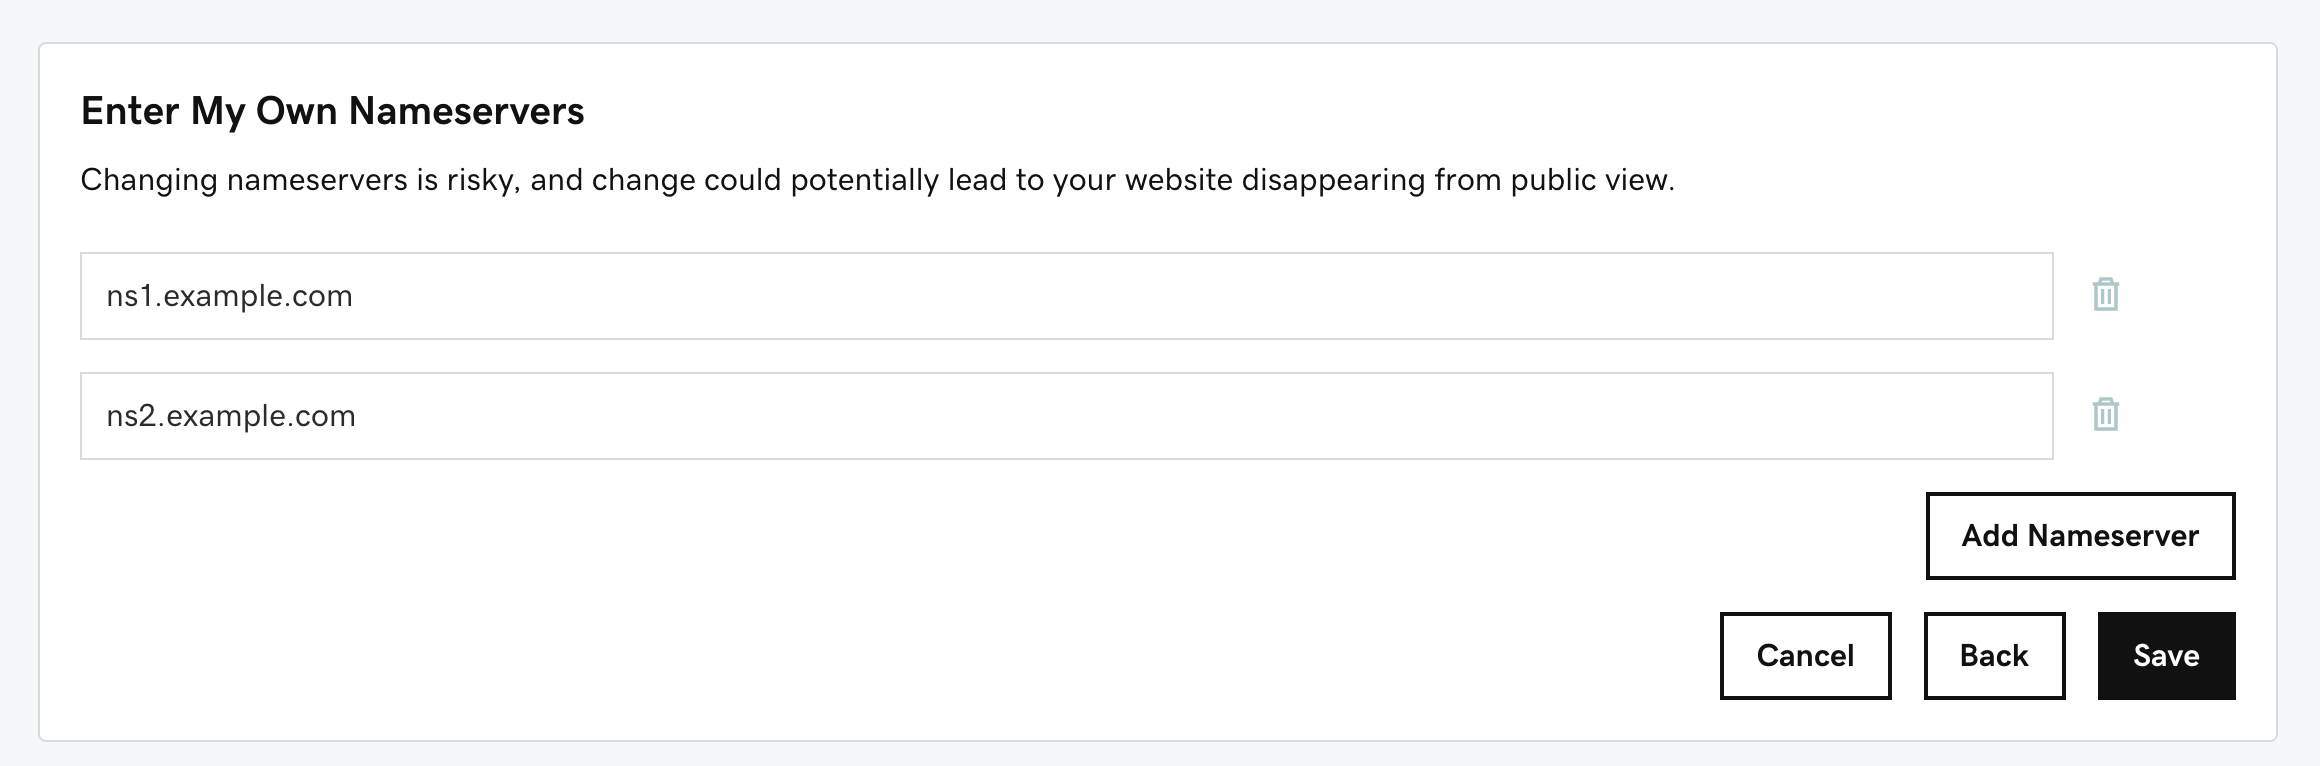
Specify the nameservers you have created earlier (
ns1.<domain_name>andns2.<domain_name>) and then click Save. -
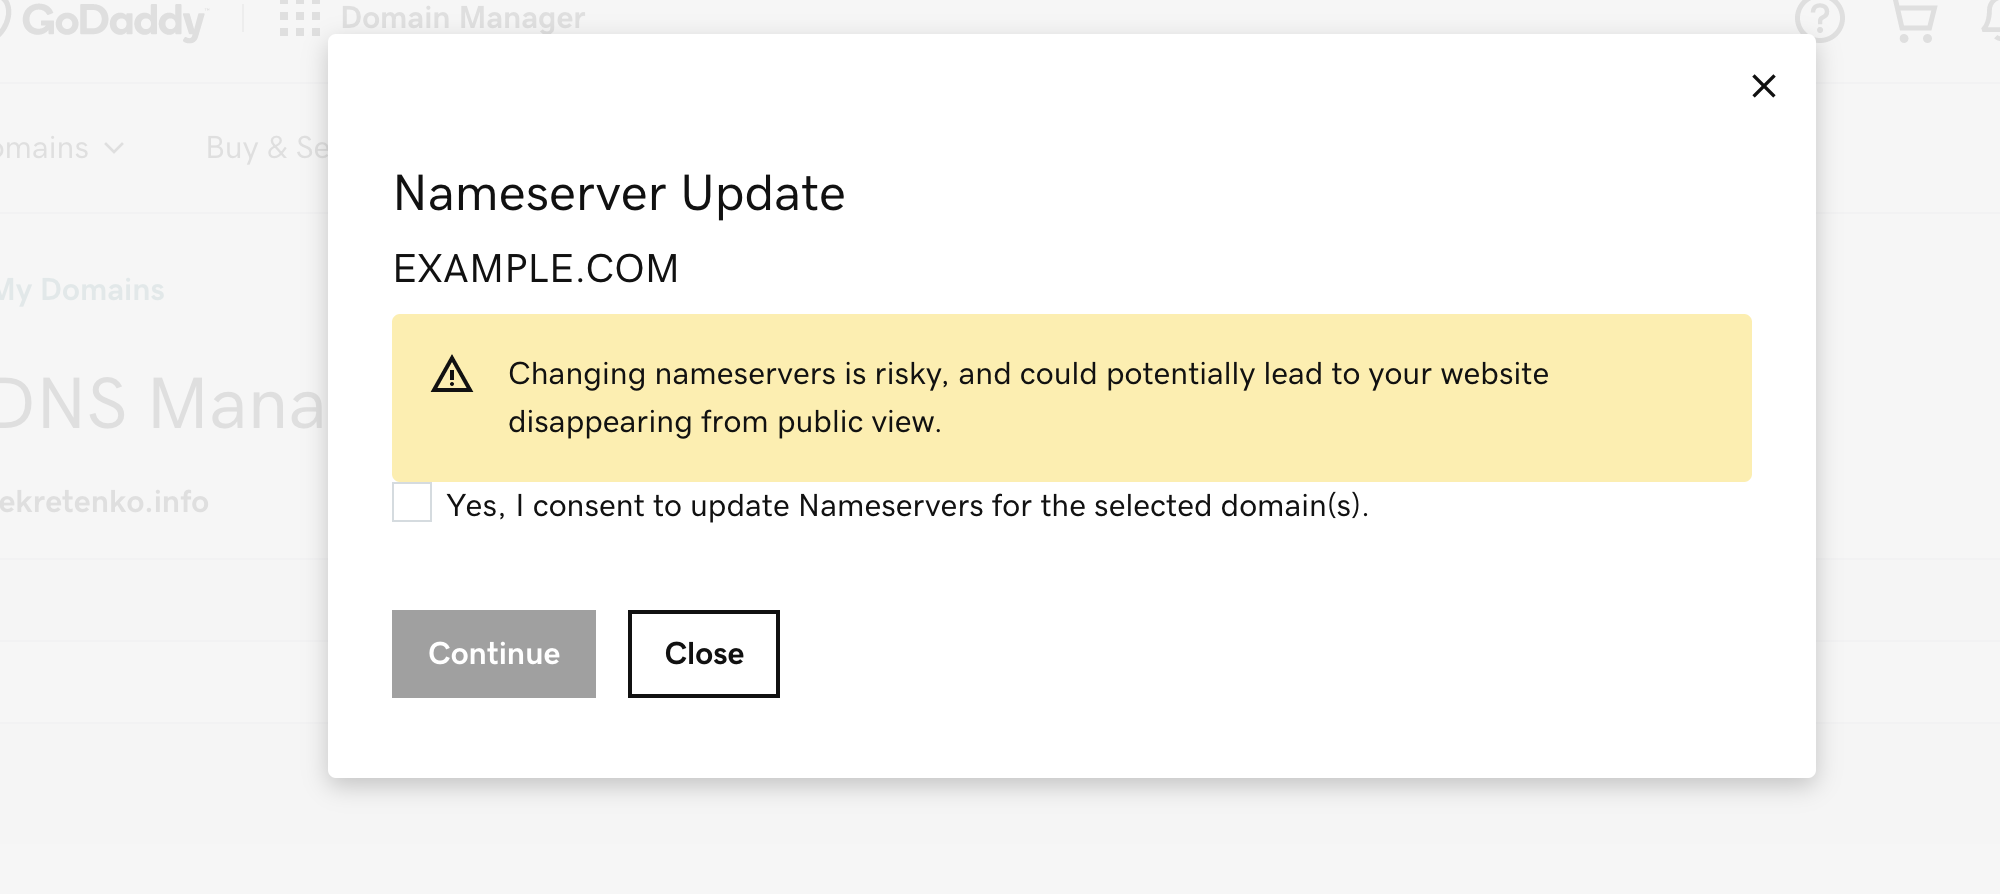
Select “Yes, I consent to update Nameservers for the selected domain(s)” and click Continue.
You have finished configuring Plesk as the primary DNS server. Your website will be up and running once changes come into effect. Propagation can take up to 24 hours.
NameCheap
Log in to Plesk.
Go to Websites & Domains > your domain > the “Hosting & DNS” tab > DNS.
-
Locate two glue records. They have the following pattern:
ns1.<domain_name>   <the Plesk server IP address>
ns2.<domain_name>   <the Plesk server IP address>
Copy the NS records’ hostnames (
ns1.<domain_name>andns2.<domain_name>) and the server IP address. You will need them later. -
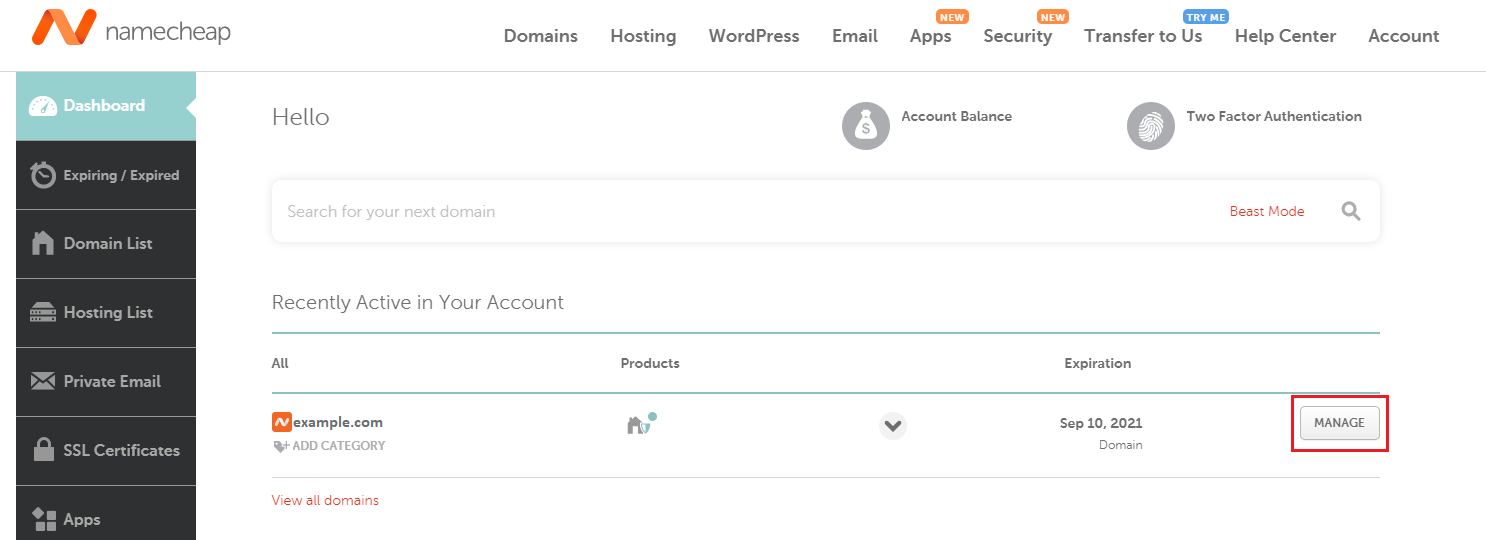
On the row corresponding to the domain, click MANAGE.
-
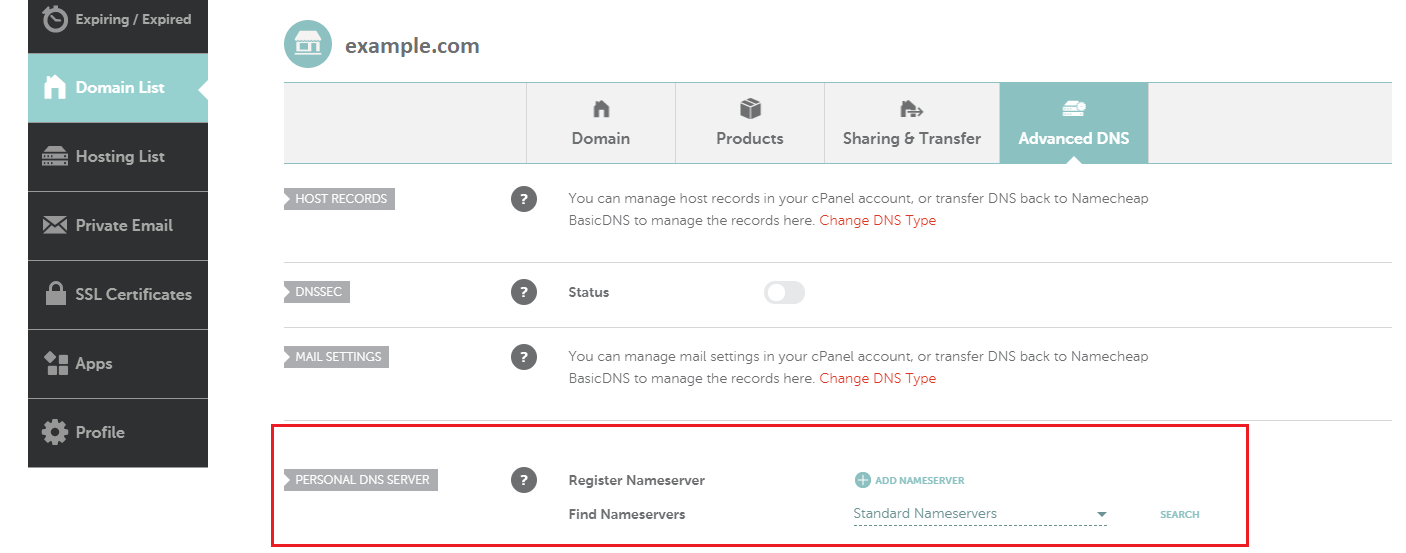
Go to the “Advanced DNS” tab and scroll down to the “PERSONAL DNS SERVER” section.
-
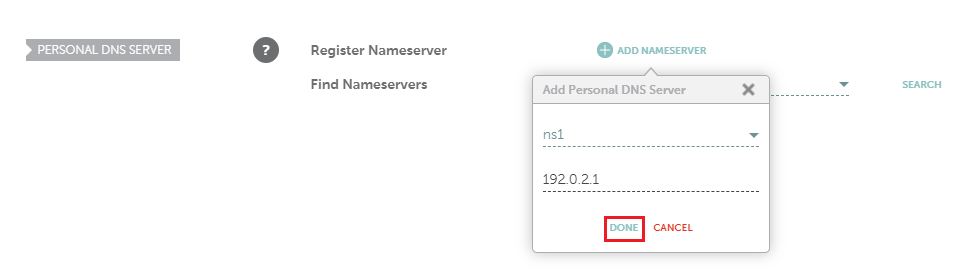
Add the first glue record. To do so, click ADD NAMESERVER. Under the “Nameserver” drop-down list, select
ns1, specify the Plesk IP address, and then click DONE. -
Add the second glue record. To do so, repeat the previous step but select
ns2.Note
The added glue records do not appear on the screen right away. To see them, in the “PERSONAL DNS SERVER” section, click SEARCH.
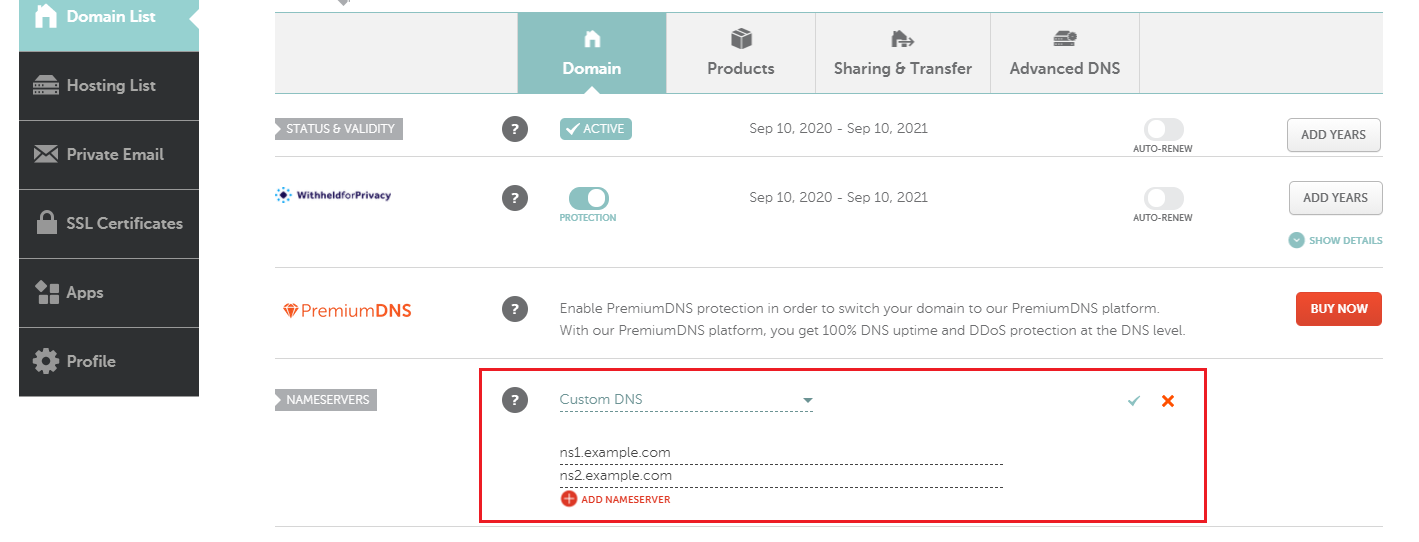
Go to the “Domain” tab.
-
In the “NAMESERVERS” section, select “Custom DNS”, specify the nameservers you have created earlier (
ns1.<domain_name>andns2.<domain_name>), and then click to save changes.

You have finished configuring Plesk as the primary DNS server. Your website will be up and running once changes come into effect. Propagation can take up to 24 hours.
Network Solutions
Log in to Plesk.
Go to Websites & Domains > your domain > the “Hosting & DNS” tab > DNS.
-
Locate two glue records. They have the following pattern:
ns1.<domain_name>   <the Plesk server IP address>
ns2.<domain_name>   <the Plesk server IP address>
Copy the NS records’ hostnames (
ns1.<domain_name>andns2.<domain_name>) and the server IP address. You will need them later. -
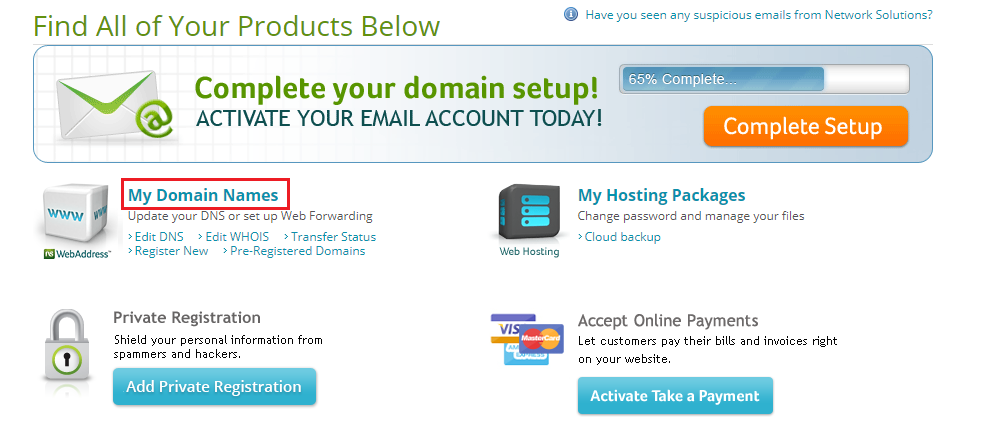
Click “My Domain Names”.
-
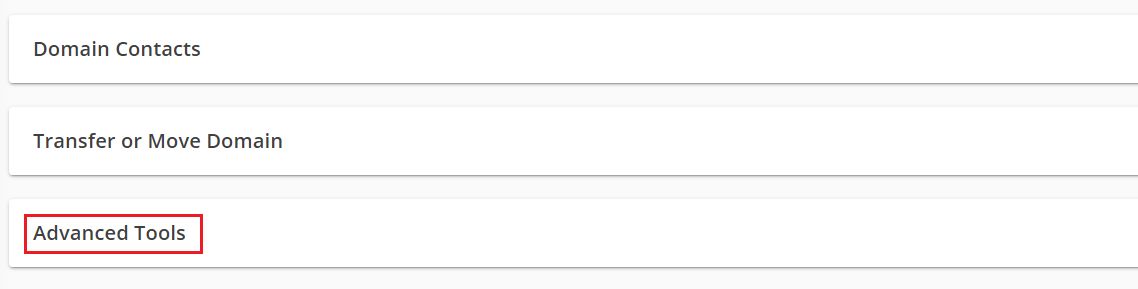
Under your domain, scroll down to the “Advanced Tools” section and click its name to unfold the section.
-
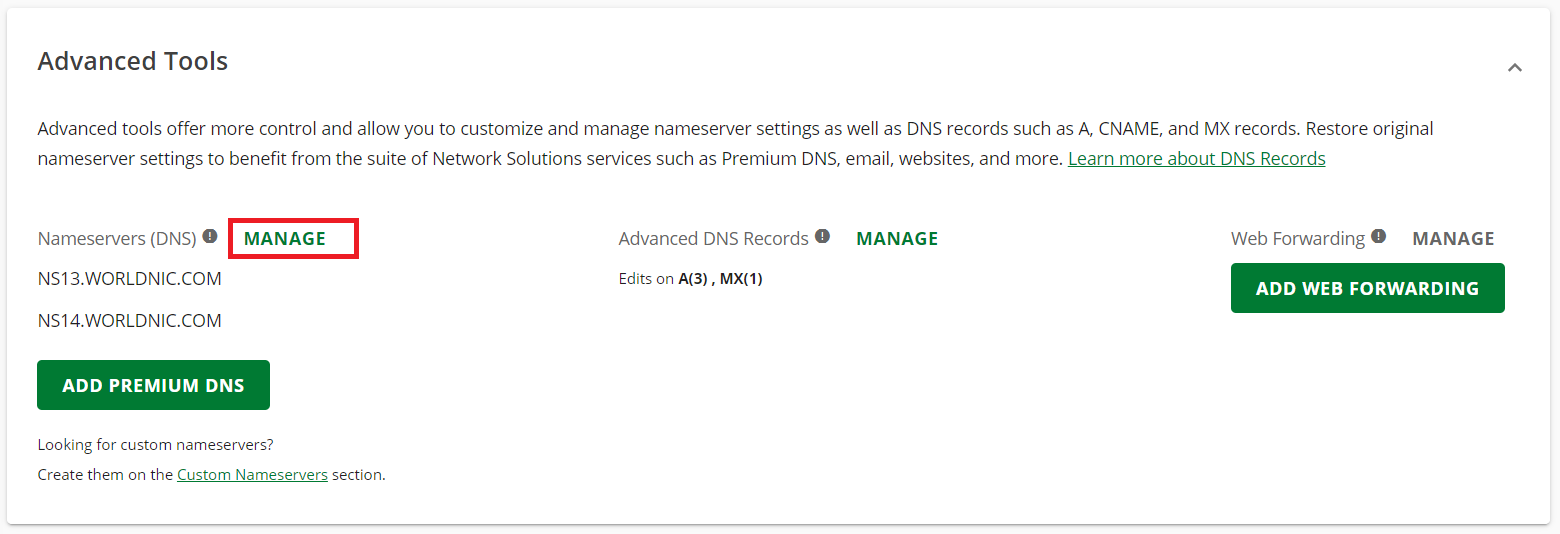
Next to “Nameservers (DNS)”, click “MANAGE”.
-
Add two nameservers
ns1.<domain_name>andns2.<domain_name>and then click SAVE. -
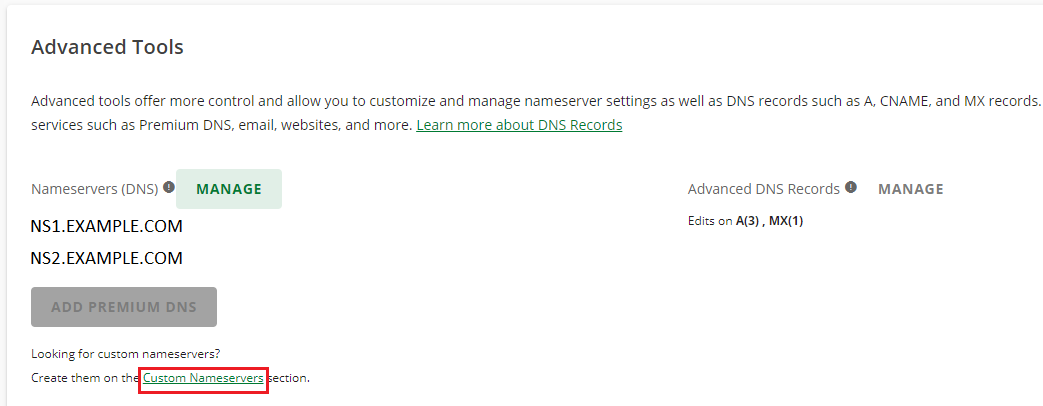
At the bottom of the “Advanced Tools” section, click “Custom Nameservers”.
-
Locate the two nameservers you have added earlier.
-
Click the first nameserver (
ns1.<domain_name>), specify the Plesk server IP address, click Go, and then click Save Changes. Repeat the previous step for the second nameserver
ns2.<domain_name>.

You have finished configuring Plesk as the primary DNS server. Your website will be up and running once changes come into effect. Propagation can take up to 72 hours.
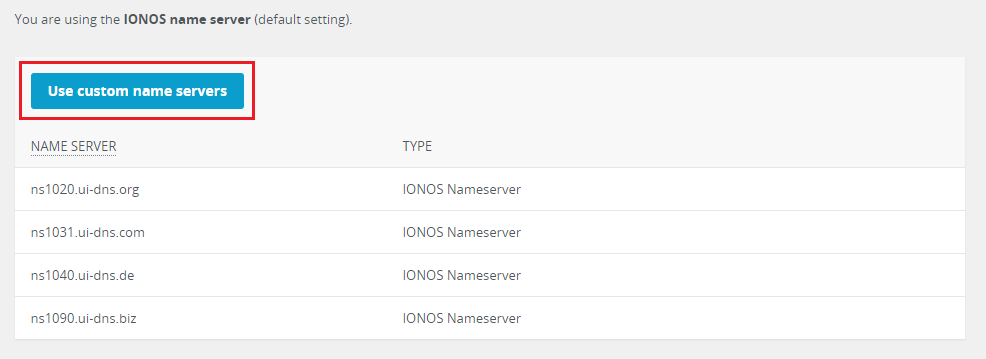
IONOS
Log in to Plesk.
Go to Websites & Domains > your domain > the “Hosting & DNS” tab > DNS.
-
Locate two glue records. They have the following pattern:
ns1.<domain_name>   <the Plesk server IP address>
ns2.<domain_name>   <the Plesk server IP address>
Copy the NS records’ hostnames (
ns1.<domain_name>andns2.<domain_name>) and the server IP address. You will need them later. -
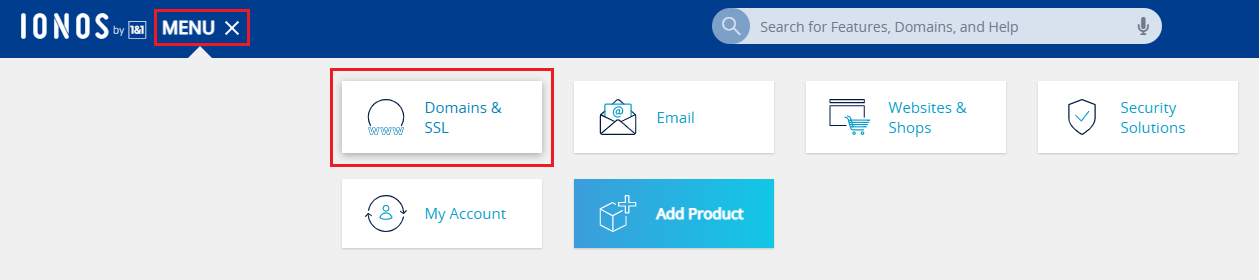
At the top, click MENU > Domains & SSL.
-
Next to your domain, click the
icon and then click Nameserver. -
Click Use custom name servers.
-
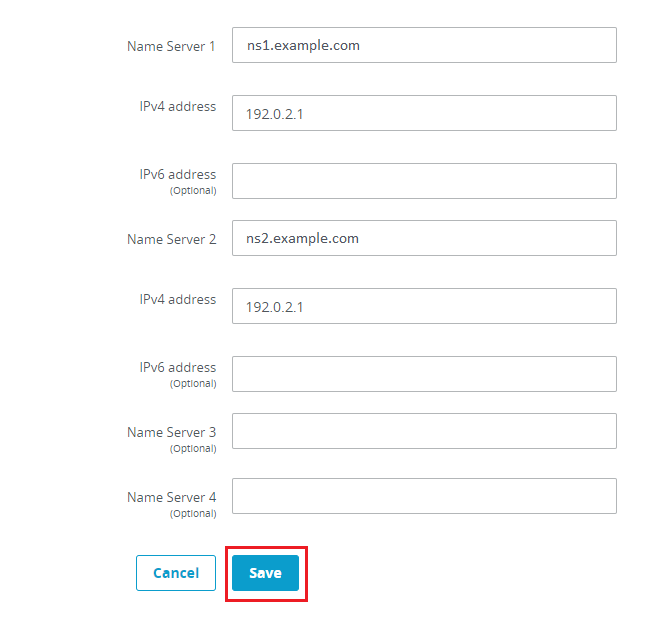
Specify two nameservers (
ns1.<domain_name>andns2.<domain_name>), the Plesk IP address, and then click Save. The fields for IP addresses will appear once you specify the nameservers.
 icon and then click Nameserver.
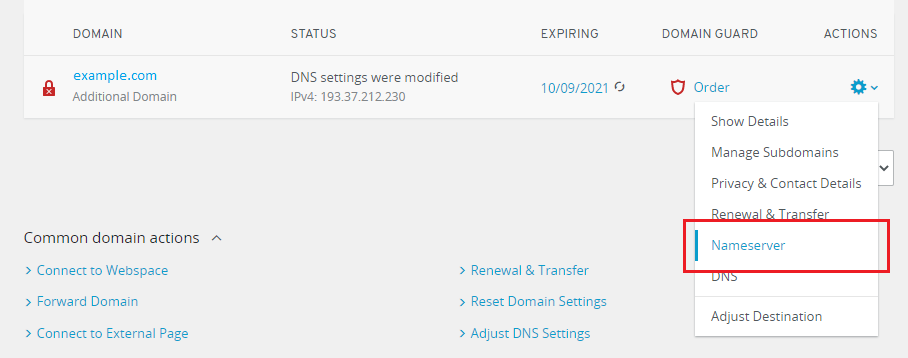
You have finished configuring Plesk as the primary DNS server. Your website will be up and running once changes come into effect. Propagation can take up to 48 hours.
Using the DNS Service of Your Registrar
Usually registrars also offer DNS service. To put your website online, you can use the DNS service of your domain registrar to connect your domain name with your website running on Plesk. This DNS configuration has the following advantages:
It is easy to set up.
Many registrars provide DNS service for free for domains you bought from them.
Note
You can also use a DNS service provider different from your registrar (for example, you bought a domain from GoDaddy but you want to use the DNS service from Enom). In this case, you often need to pay for the DNS service. You usually find the prices in the terms and conditions of your DNS service provider.
Below you will find step-by-step procedures of putting your website online with the most popular top registrars. We will also describe how to configure DNS for mail if you want to use mail in Plesk.
Note
If our documentation does not cover your registrar, you can try to configure DNS automatically via the Domain Connect extension installed in Plesk by default.
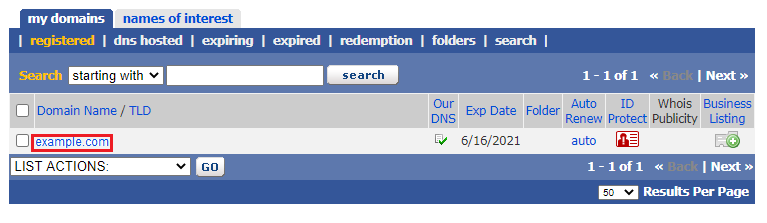
To put your website online with Enom
-
Go to Domains > My Domains.
-
Click your domain name.
-
Under “Manage Domain”, select “Host Records”.
-
Add the following A records:
Host Name
Record Type
Address
@
A (Address)
<your server IP>www
A (Address)
<your server IP>A (Address)
<your server IP>To do so, click new row (as many times as necessary), fill in the data, and then click Save.
The A records you have added have various hostnames and they do the following:
wwwpoints your domain with www (www.example.com) to your server IP address.@points your naked domain without www (justexample.com) to your server IP address.*points any subdomain (<anything>.example.com) to your server IP address.
Depending on your purpose, you may not need all three A records. However, if you are not sure which A records you need, we recommend that you add all three.
Note
If you want to use mail in Plesk, the A record with the
*hostname is mandatory.After you add A records, you have finished configuring DNS. Your website will be up and running once changes come into effect. Propagation can take up to 48 hours.
If you want to use mail in Plesk, proceed with the following steps. If you do not, your DNS configuration is finished.
-
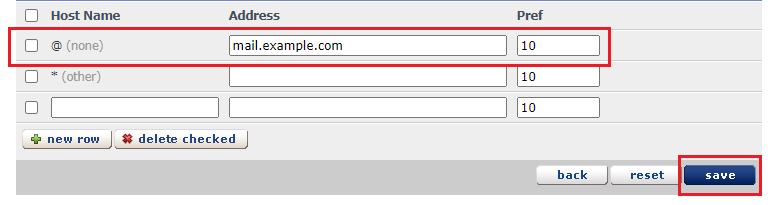
Click “Edit MX Records”.
-
Add the following MX record and then click Save:
Host Name
Address
Pref
@
<your server hostname>, for example,mail.example.com10


You have configured DNS for mail. You can now use mail in Plesk.
To put your website online with GoDaddy
Log in to your GoDaddy Domain Control Center.
-
Next to your domain name, click the
icon and then click Manage DNS. -
Add the following A records:
Type
Host
Points to
TTL
A
@
<your server IP>1 Hour
A
www
<your server IP>1 Hour
A
<your server IP>1 Hour
To do so, click Add, select the “A” type, specify the data, and then click Save. Repeat this as many times as many A records you need to add.
The A records you have added have various hostnames and they do the following:
wwwpoints your domain with www (www.example.com) to your server IP address.@points your naked domain without www (justexample.com) to your server IP address.*points any subdomain (<anything>.example.com) to your server IP address.
Depending on your purpose, you may not need all three A records. However, if you are not sure which A records you need, we recommend that you add all three.
Note
If you want to use mail in Plesk, the A record with the
*hostname is mandatory.After you add A records, you have finished configuring DNS. Your website will be up and running once changes come into effect. Propagation can take up to 48 hours.
If you want to use mail in Plesk, proceed with the following steps. If you do not, your DNS configuration is finished.
-
Add the following MX record and then click Save:
Type
Host
Points to
Priority
TTL
MX
@
<your server hostname>, for example,mail.example.com10
1 Hour
 icon and then click Manage DNS.
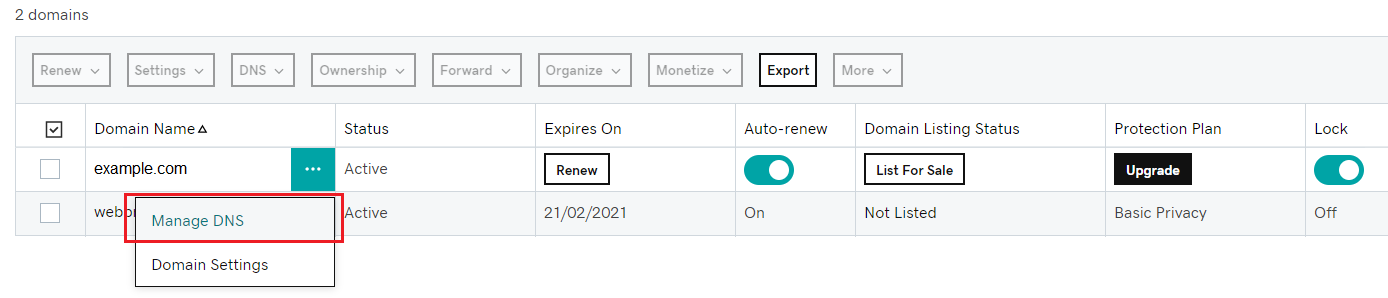
You have configured DNS for mail. You can now use mail in Plesk.
To put your website online with NameCheap
-
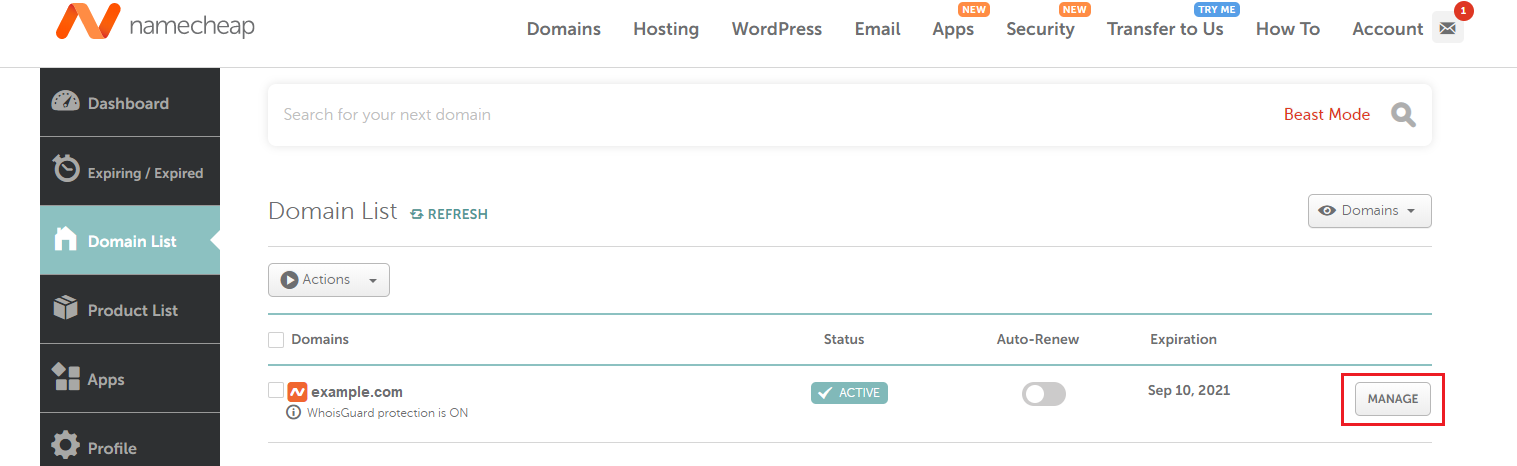
Go to Domain List in the left pane, locate your domain, and then click Manage next to it.
-
Go to the “Advanced DNS” tab.
-
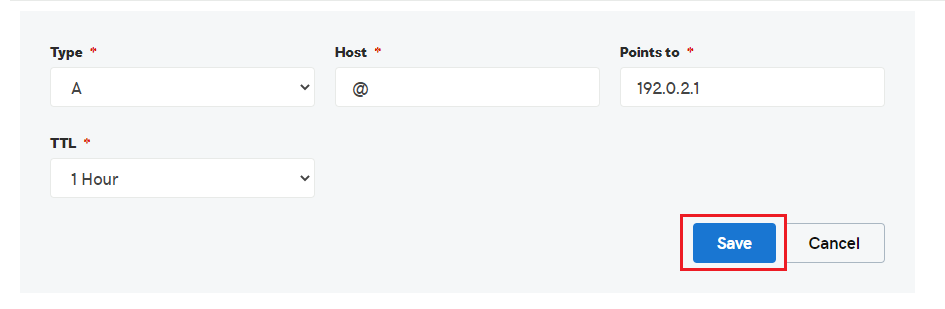
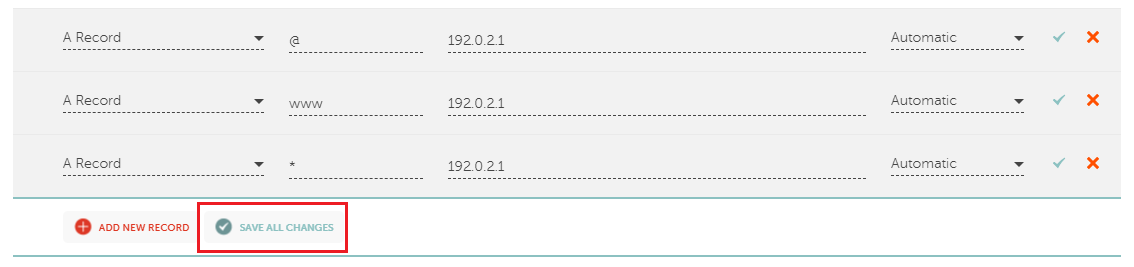
Add the following A records:
Type
Host
Value
TTL
A Record
@
<your server IP>Automatic
A Record
www
<your server IP>Automatic
A Record
<your server IP>Automatic
To do so, in the “HOST RECORDS” section, click Add New Record, select “A Record”, and then specify the data.
Repeat this as many times as many A records you need to add and then click Save All Changes.
The A records you have added have various hostnames and they do the following:
wwwpoints your domain with www (www.example.com) to your server IP address.@points your naked domain without www (justexample.com) to your server IP address.*points any subdomain (<anything>.example.com) to your server IP address.
Depending on your purpose, you may not need all three A records. However, if you are not sure which A records you need, we recommend that you add all three.
Note
If you want to use mail in Plesk, the A record with the
*hostname is mandatory.After you add A records, you have finished configuring DNS. Your website will be up and running once changes come into effect. Propagation can take up to 48 hours.
If you want to use mail in Plesk, proceed with the following steps. If you do not, your DNS configuration is finished.
-
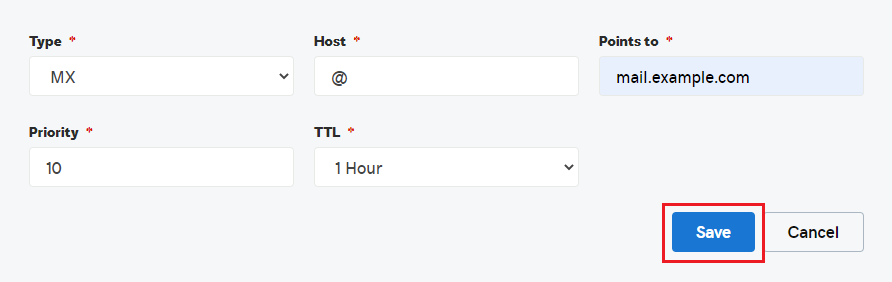
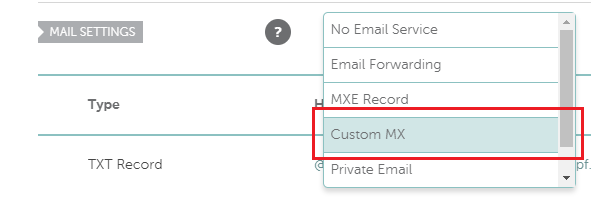
Scroll down to the “MAIL SETTINGS” section. In the dropdown list next to it, select “Custom MX”.
-
Add the following MX record and then click Save All Changes:
Type
Host
Value
Priority
TTL
MX Record
@
<your server hostname>, for example,mail.example.com10
Automatic

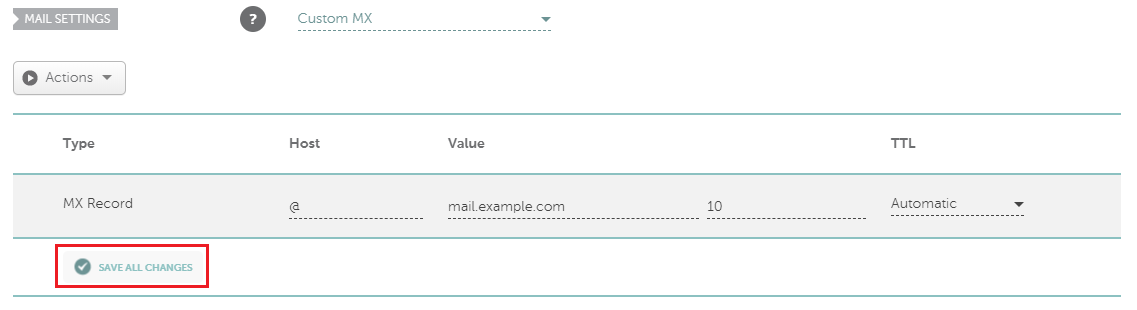
You have configured DNS for mail. You can now use mail in Plesk.
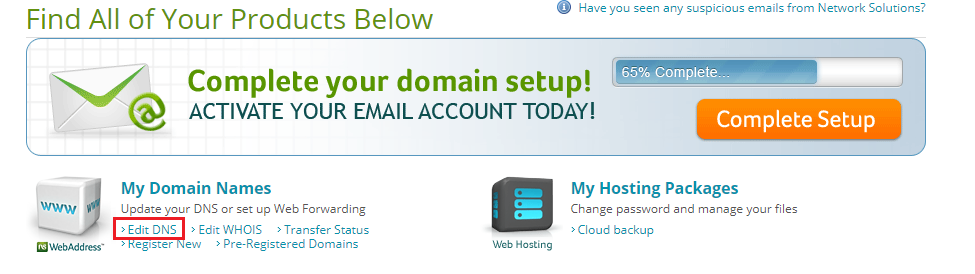
To put your website online with Network Solutions
-
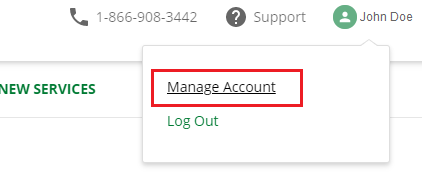
Click your profile name and then click Manage Account.
-
Under “My Domain Names”, click “Edit DNS”.
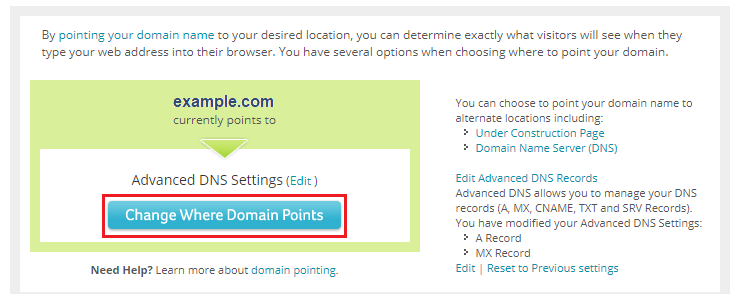
-
Click Change Where Domain Points.
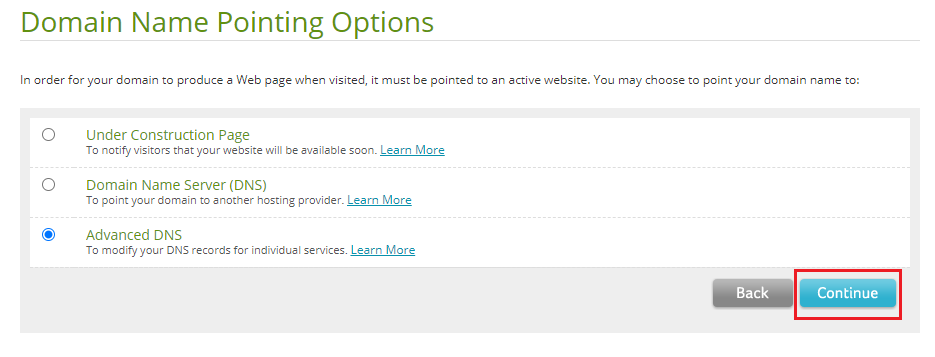
-
Select “Advanced DNS” and then click Continue.
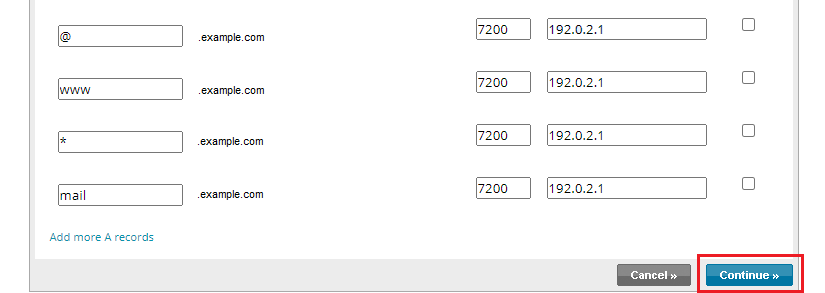
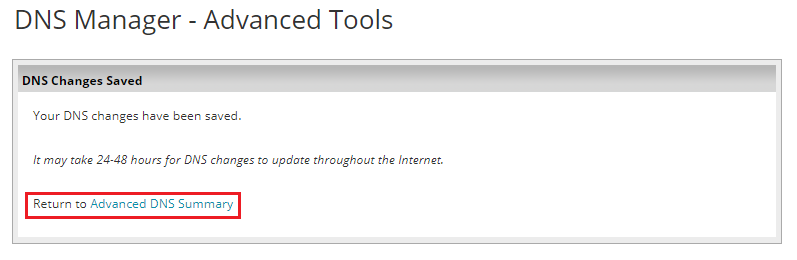
In the “IP Address (A Records)” section, click Edit A Records.
-
Add the following A records and then click Continue:
Host
TTL
Numeric IP
@
<.your domain name>7200
<your server IP>www
<.your domain name>7200
<your server IP><.your domain name>7200
<your server IP>mail
<.your domain name>7200
<your server IP>The A records you have added have various hostnames and they do the following:
wwwpoints your domain with www (www.example.com) to your server IP address.@points your naked domain without www (justexample.com) to your server IP address.*points any subdomain (<anything>.example.com) to your server IP address.mailpoints yourmail.*subdomain (mail.example.com) to your server IP address.
Depending on your purpose, you may not need all four A records. However, if you are not sure which A records you need, we recommend that you add all four.
Note
If you want to use mail in Plesk, the A record with the
mailhostname is mandatory. -
Click Save Changes and then click “Return to Advanced DNS Summary”.
You have finished configuring DNS. Your website will be up and running once changes come into effect. Propagation can take up to 48 hours.
If you want to use mail in Plesk, proceed with the following steps. If you do not, your DNS configuration is finished.
Scroll down to the “Mail Servers (MX Records)” section and click Edit MX Records next to it.
-
Add the following MX record and then click Save:
Sub-Domain (Optional)
Priority
TTL
Mail Server
<.your domain name>10
7200
<your server hostname>, for example,mail.example.com Click Save Changes and then click “Return to Advanced DNS Summary”.
You have configured DNS for mail. You can now use mail in Plesk.
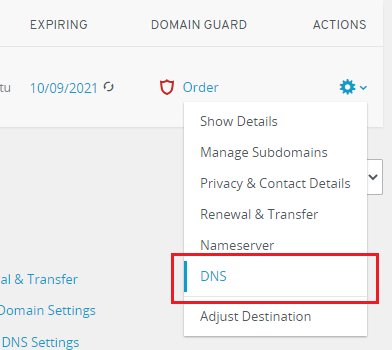
To put your website online with IONOS
-
In the “Domains” section of the Control Panel, next to your domain, click the
icon
and then select “DNS”. -
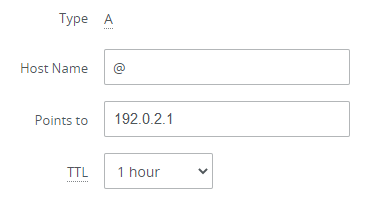
Add the following A records:
Type
Host Name
Points to
TTL
A
@
<your server IP>1 hour
A
www
<your server IP>1 hour
A
<your server IP>1 hour
To do so, click Add Record, select the A type, specify the data, and then click Save. Repeat this step as many times as many A records you need to add.
Note
IONOS adds the A record with the
wwwhostname automatically unless you select not to add it.The A records you have added have various hostnames and they do the following:
wwwpoints your domain with www (www.example.com) to your server IP address.@points your naked domain without www (justexample.com) to your server IP address.*points any subdomain (<anything>.example.com) to your server IP address.
Depending on your purpose, you may not need all three A records. However, if you are not sure which A records you need, we recommend that you add all three.
Note
If you want to use mail in Plesk, the A record with the
*hostname is mandatory.You have finished configuring DNS. Your website will be up and running once changes come into effect. Propagation can take up to 48 hours.
If you want to use mail in Plesk, proceed with the following steps. If you do not, your DNS configuration is finished.
-
Add the following MX record:
Type
Host Name
Points to
Priority
TTL
MX
@
<your server hostname>, for example,mail.example.com10
1 Hour
To do so, click Add Record, select the MX type, specify the data, and then click Save.
You have configured DNS for mail. You can now use mail in Plesk.
Using a Third-Party DNS Service Synced with Plesk
A number of DNS services can integrate with Plesk, for example, DigitalOcean DNS, Amazon Route 53, Azure DNS, and so on. You can use them to put your website online, which has the following advantages:
The DNS records are stored in the DNS service but you can manage them directly in Plesk. DNS zones will be automatically synced between Plesk and the DNS service.
No need to set up and maintain a secondary DNS server. The DNS services mentioned above offer DNS hosting with three or more different nameservers. This will reduce your Plesk server load and improve DNS hosting reliability.
Amazon Route 53
Watch the video tutorial
Amazon Route 53 is a paid DNS service, which offers four nameservers.
You can set up DNS hosting before or after adding domains to Plesk. Either way, both new and existing domains will be automatically synced with the DNS service.
To put your website online with Amazon Route 53:
Save the access key ID and the secret access key of your account. If you use the IAM user account, make sure to grant the
route53:*androute53domains:*permissions to the account.Log in to Plesk.
Make sure that the DigitalOcean DNS, Slave DNS Manager, and Microsoft Azure DNS extensions are not installed. If they are, remove them to avoid conflict with Amazon Route 53.
Go to Extensions, look for the Amazon Route 53 extension, and then click Get it free to install it.
Next to the installed extension, click Open.
Select the key type that you use: root account or IAM user account.
Paste the access key ID and the secret access key that you got during step 2.
Select the “Manage NS and SOA records” and the “Turn on Amazon Web Service Route 53” checkboxes and then click Log in.
Go to your registrar’s dashboard and change the registrar’s nameservers to those of Amazon Route 53. Find out your Amazon Route 53 nameservers.
You have finished configuring DNS. Your website will be up and running once changes come into effect. They are rolled out gradually: more and more visitors will have access to your website with time. Propagation can take up to 48 hours.
DigitalOcean DNS
Watch the video tutorial
DigitalOcean DNS is a free DNS service, which offers three nameservers.
Note
You cannot create a domain in Plesk if its name matches the name of a website that is already hosted in DigitalOcean DNS.
To put your website online with DigitalOcean DNS:
Log in to Plesk.
Make sure that the DigitalOcean DNS extension is installed. In Plesk on DigitalOcean, the extension is installed by default.
Make sure that the Amazon Route 53, Slave DNS Manager, and Microsoft Azure DNS extensions are not installed. If they are, remove them to avoid conflict with DigitalOcean DNS.
Go to Extensions > the “My Extensions” tab, and click Open under “DigitalOcean DNS”.
-
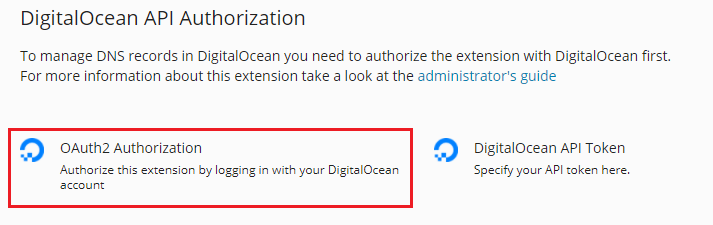
Choose how to connect Plesk to your DigitalOcean account. You can do so in two ways:
-
“OAuth2 Authorization” is the easiest way if you have your personal DigitalOcean account and one Plesk server.
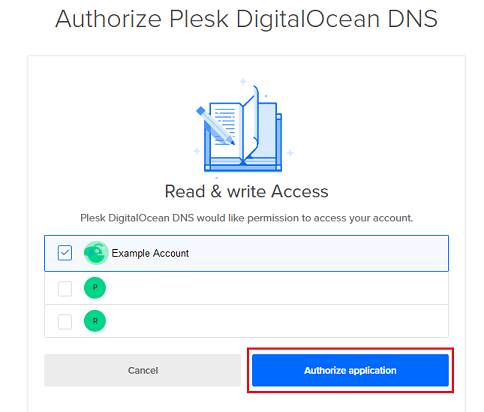
Click “OAuth2 Authorization” and you will be redirected to the DigitalOcean login page. Sign in with your DigitalOcean account, choose your account (if you have more than one), and click Authorize application.
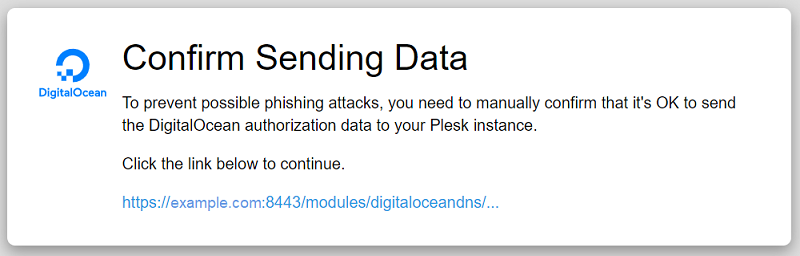
Then click the link to confirm sending the DigitalOcean authorization data to your Plesk.
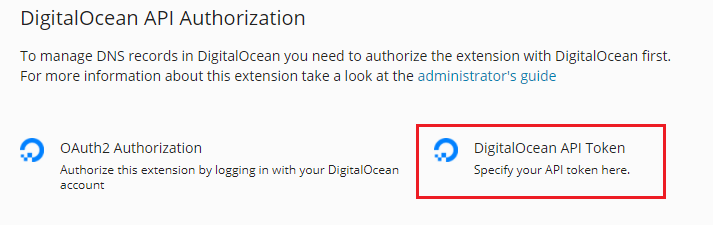
-
If you are a member of a corporate DigitalOcean DNS account, use “DigitalOcean API token”. It is also the preferred way if you have multiple Plesk servers. In this case, we recommend that you generate a separate DigitalOcean API token for each server.
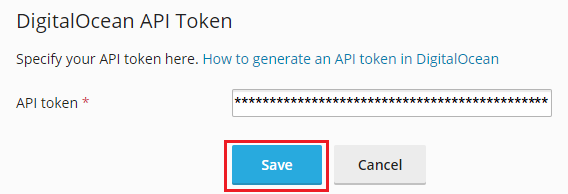
Click “DigitalOcean API token”, sign in with your DigitalOcean account in a new browser tab, generate a DigitalOcean API token, and then copy it. Return to the Plesk tab, paste the token, and then click Save.
Now new and existing domains in Plesk will be automatically synced with DigitalOcean DNS. The “Active” status of the domains under the “DigitalOcean DNS Zone” column notifies that they are synced automatically.
Note
Plesk does not sync the following domains with DigitalOcean DNS neither automatically nor manually:
That have the “Disabled (formely known as Suspended)” or “Suspended” status.
Whose DNS zone is disabled or is of the secondary type.
-
Contact your registrar (the one you bought your domain name from) and change the nameservers to DigitalOcean’s nameservers:
ns1.digitalocean.com,ns2.digitalocean.com, andns3.digitalocean.com. See instructions on how to do so for many popular registrars (GoDaddy, IONOS by 1&1, HostGator, and others).

You have finished configuring DNS. Your website will be up and running once changes come into effect. They are rolled out gradually: more and more visitors will have access to your website with time. Propagation can take up to 48 hours.
Note
You may want to have certain domains not synced with DigitalOcean DNS automatically. For example, important domains whose DNS records you want to manage yourself directly in DigitalOcean DNS. In this case, to prevent Plesk from overriding the domains’ DNS records in DigitalOcean DNS, deactivate automatic sync for these domains. To do so, select one or several domains and then click Deactivate. However, to put these websites online, you will need to create all the necessary DNS records in DigitalOcean DNS yourself.
Azure DNS
Azure DNS is a paid DNS service, which offers four nameservers.
Configuring Azure DNS is more difficult than configuring DNS of other third-party DNS services synced with Plesk.
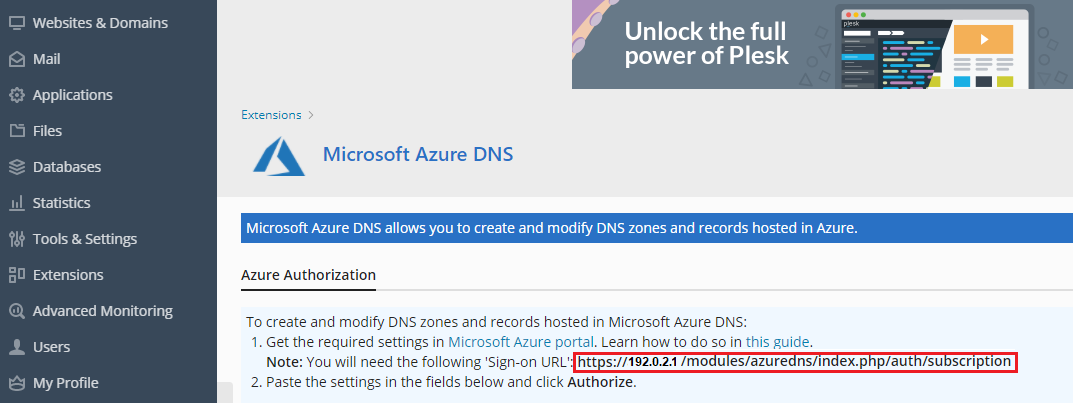
To put your website online with Azure DNS:
Step 1 - Installing the Azure DNS extension
Log in to Plesk.
Make sure that the Azure DNS extension is installed. In Plesk on Microsoft Azure, the extension is installed by default.
Make sure that the Amazon Route 53, Slave DNS Manager, and DigitalOcean DNS extensions are not installed. If they are, remove them to avoid conflict with Azure DNS.
Go to Extensions > the “My Extensions” tab and click Open under “Azure DNS”.
Step 2 - Creating an Azure subscription (if you do not have one)
Log in to the Azure dashboard using your account.
-
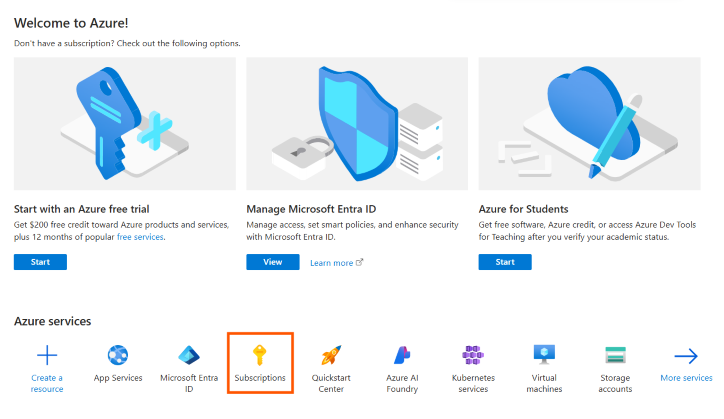
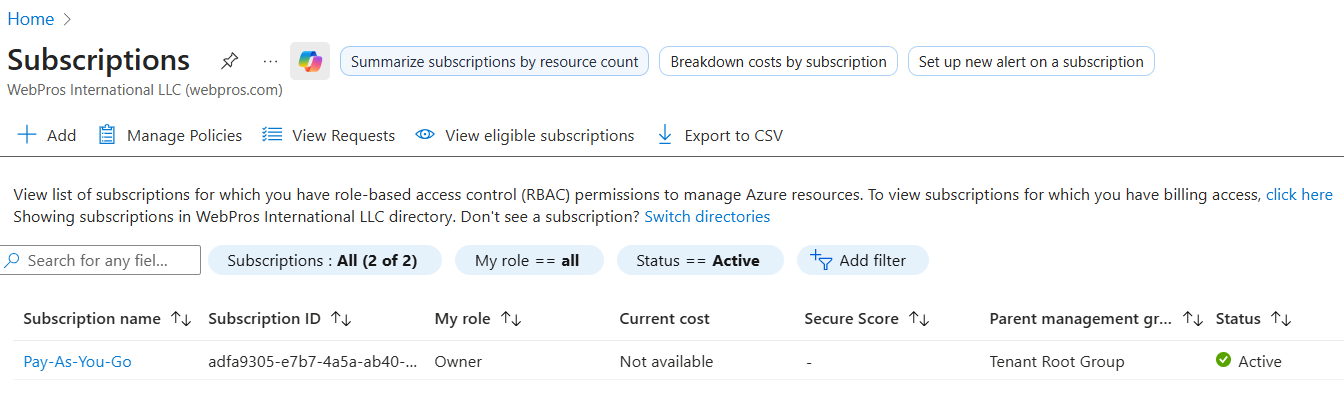
To set up Azure DNS, you need to have an Azure subscription first. Go to Subscriptions and see if you have one.
If you have a subscription, go to Step 3 - Enabling “Microsoft.Network” resource provider. If you do not have one, start creating a subscription by clicking Add.
On the “Pay-As-You-Go” card, click Select offer.
Fill in your profile and payment information, choose a technical support plan (if you need one), select the agreement checkbox and then click Sign up.
You have created a subscription.
Step 3 - Enabling “Microsoft.Network” resource provider
-
Click the subscription name and then click Resource providers.
-
Find the “Microsoft.Network” resource provider in the list and make sure that it has the “Registered” status. If it does not, select “Microsoft.Network” and then click Register.
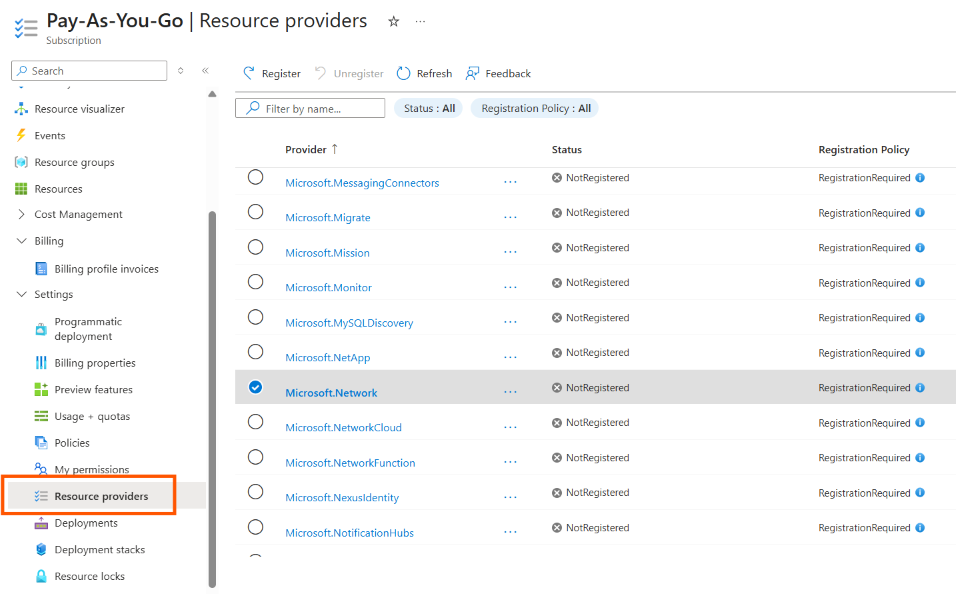
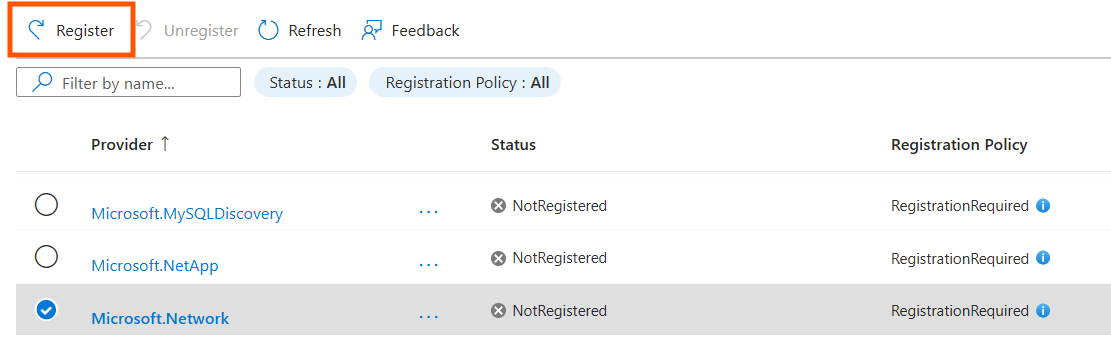
When “Microsoft.Network” is shown as “Registered”, go to the next step.
Note
If you have any issues with registering “Microsoft.Network”, refer to this article.
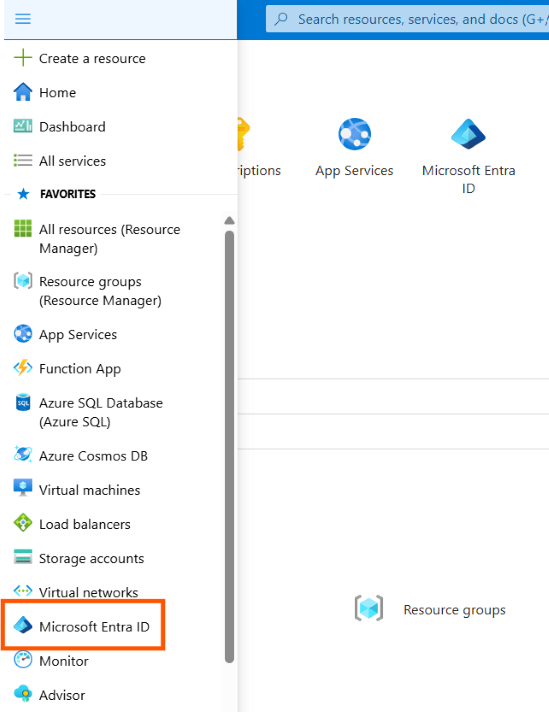
Step 4 - Creating an application
-
Click the hamburger menu button in the top left corner of the screen and then click Microsoft Entra ID.
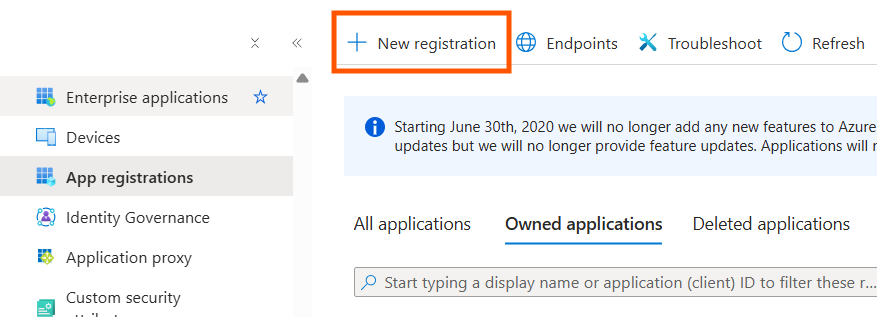
-
Click App registrations and then click New registration.
-
Specify the application information:
A name, for example, “Plesk DNS”.
Keep the first option “Accounts in this organizational directory only” selected.
Under “Redirect URI (optional)”, keep “Web” selected.
-
Return to the Plesk tab where the Azure DNS extension is opened and copy the link shown there.
-
Return to the Azure tab. Under “Redirect URI (optional)”, paste the link next to “Web”, and then click Register.
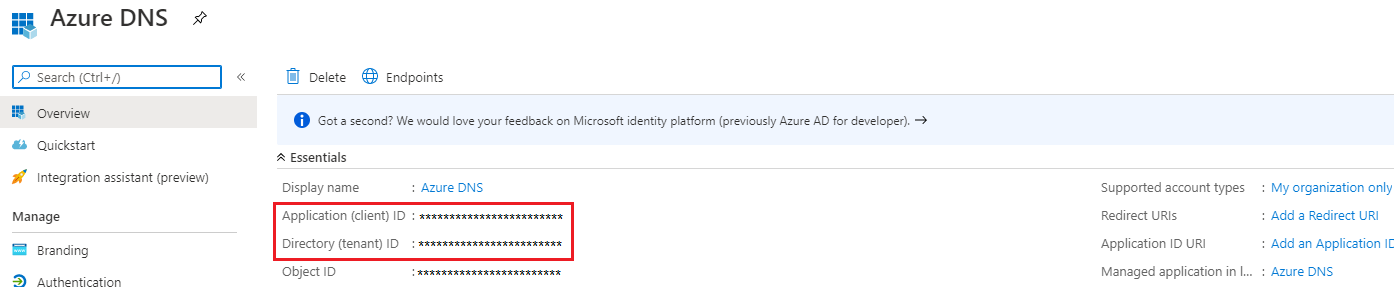
-
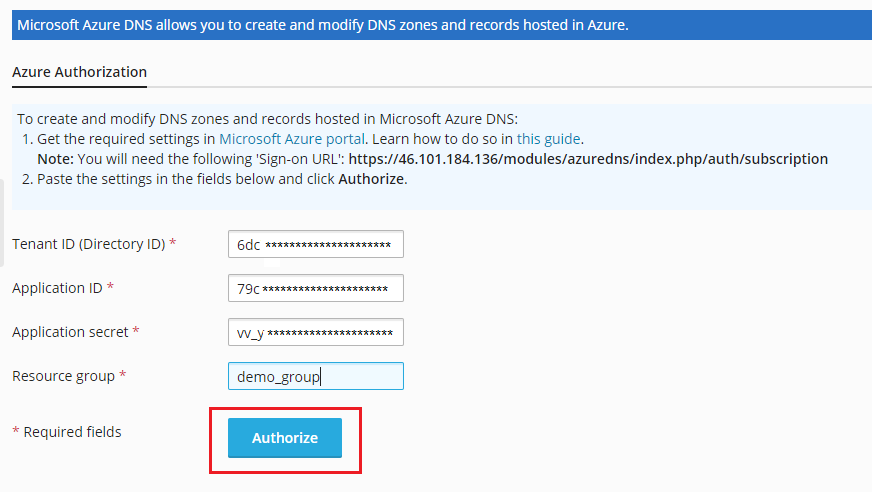
You have created an application. Copy “Application (client) ID” and “Directory (tenant ID)” and paste them into the corresponding fields on the Azure DNS extension page.

Step 5 - Creating a secret
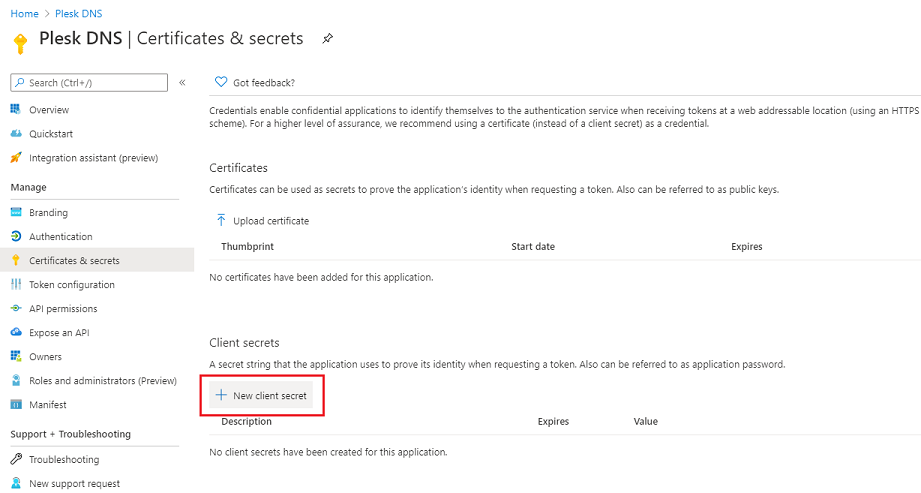
-
In the left pane, click Certificates & Secrets and then click New client secret.
-
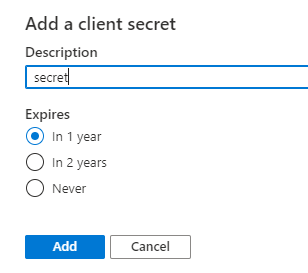
Give the secret a description and click Add.
-
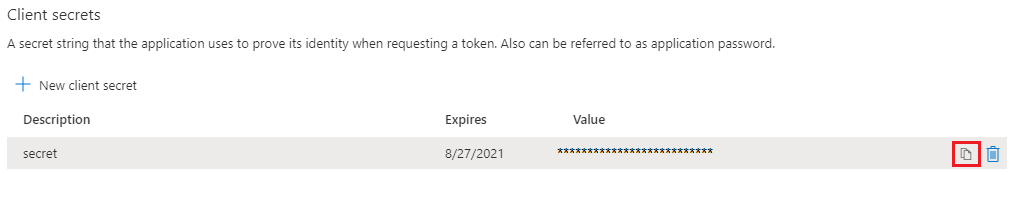
Copy the secret value and paste it into the corresponding field on the Azure DNS extension page.
Note
You will not see the secret value anymore after you leave this Azure page or perform another operation here.
Step 6 - Creating a resource group
-
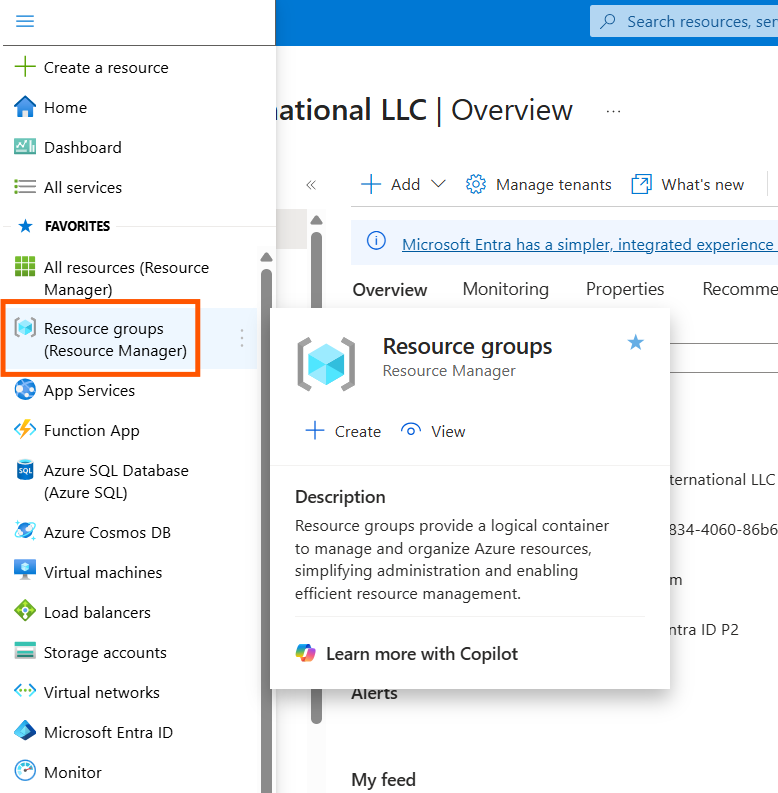
Click the hamburger menu button in the top left corner of the screen, click Resource groups, and then click Create resource group (if you do not have any) or Add (if you have one).
-
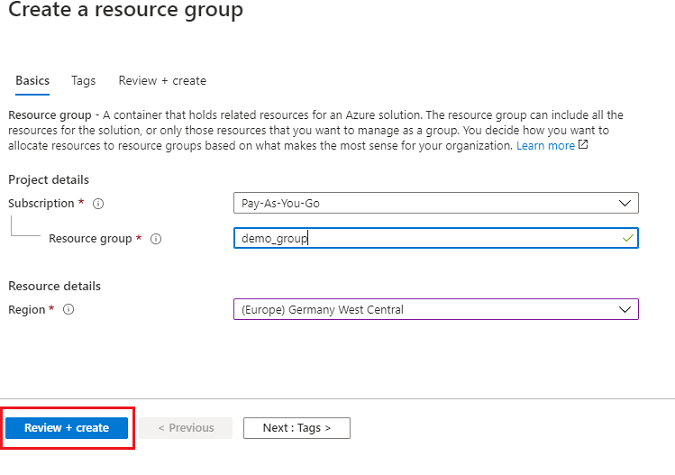
Give the resource group a name, select your region, click Review + create, and then click Create.
Once the resource group is created, paste its name into the corresponding field on the Azure DNS extension page.
Step 7 - Adding a role assignment
-
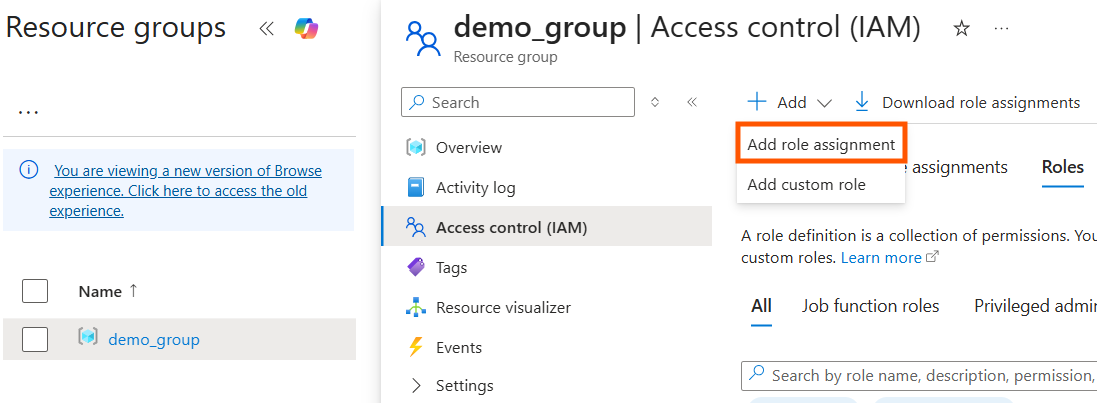
Click the name of the created resource group, click Access control (IAM), and then click Add > Add role assignment.
-
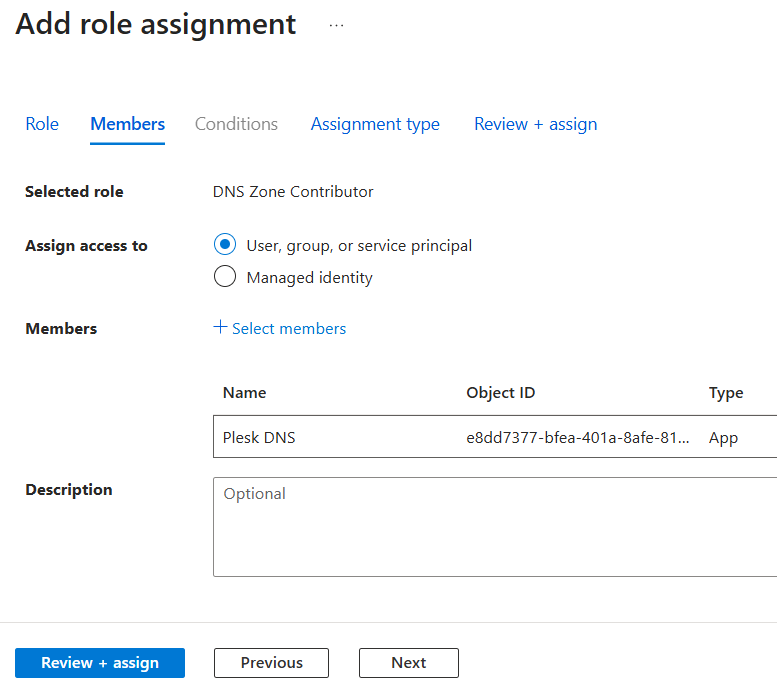
Specify the role assignment settings and then click Save:
Under “Role”, select “DNS zone contributor”.
For “Assign access to” choose User, group, or service principal.
Click “Select members” and select the name of the created application (“Plesk DNS” in our example).
By now, you have configured everything necessary in the Azure portal and filled in the required fields on the Azure DNS extension page. Now it’s time to launch the integration.
Step 8 (final) - Integrating the Azure DNS extension with the Azure portal
-
Return to the Plesk tab where the Azure DNS extension is opened and click Authorize.
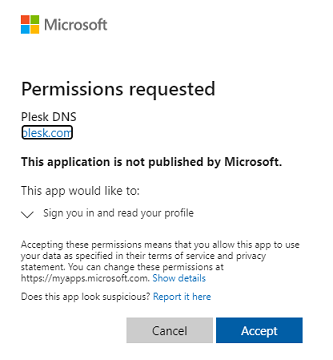
Log in to your Microsoft account.
-
Click Accept to grant the Azure DNS extension the permission to integrate with the Azure portal.
-
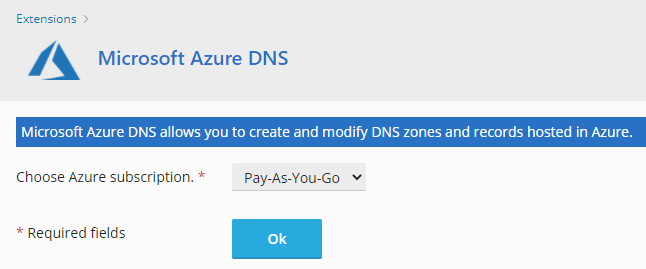
Select the subscription that you created (or had right from the start) and then click OK.
-
Select the domain that you want to put online and click Activate.
-
Wait a while until Azure DNS is activated.
Contact your registrar (the one you bought your domain name from) and change the nameservers to Azure nameservers. To see them, go to the Azure DNS extension page, select the domain name and then click Zone NS records.

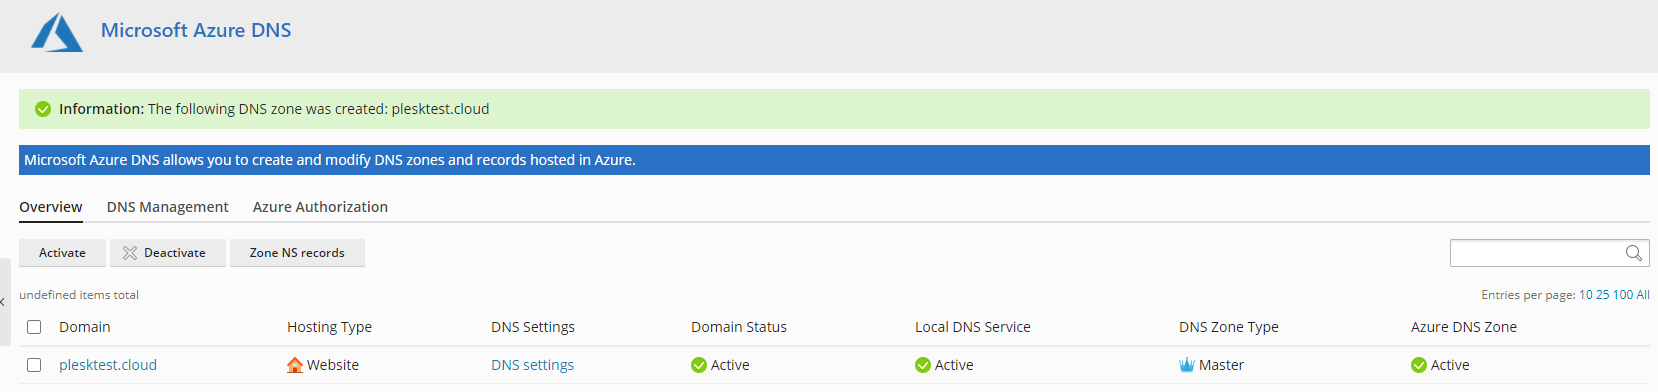
Congratulations! You have finished configuring DNS. Your website will be up and running once changes come into effect. They are rolled out gradually: more and more visitors will have access to your website with time. Propagation can take up to 48 hours.
Cloudflare DNS
The Cloudflare DNS service is a reliable DNS hosting service offering additional benefits such as caching and protection from DDoS attacks. Both free and paid plans are available, with different features. Learn how to connect or switch websites hosted in Plesk to Cloudflare DNS.