Securing Plesk and the Mail Server With SSL/TLS Certificates
summary
SSL/TLS certificates protect sensitive data by encrypting connections between the client and the server. To improve security, Plesk and the mail server are automatically secured with a free SSL/TLS certificate from Let’s Encrypt during Plesk installation.
In this topic you will learn how to manually secure both Plesk and the Plesk mail server with a free SSL/TLS certificate from Let’s Encrypt, an SSL/TLS certificate purchased from a certificate authority, or a self-signed SSL/TLS certificate.
In most cases, this feature provides you with security and peace of mind without any actions on your part. Plesk can issue an SSL/TLS certificate from Let’s Encrypt even if the server does not have a resolvable hostname. However some glitches may happen.
If, for some reason, an SSL/TLS certificate from Let’s Encrypt was not issued, Plesk and the mail server will be automatically secured with a self-signed SSL/TLS certificate. Self-signed SSL/TLS certificates encrypt connections and protect your sensitive data from being intercepted. However they come with a drawback. Anyone visiting a Plesk server secured with a self-signed SSL/TLS certificate will see a warning telling them that the website is not trusted. This may worry your customers. To avoid this, we recommend that you manually secure Plesk and the Plesk mail server with either a free SSL/TLS certificate from Let’s Encrypt or an SSL/TLS certificate purchased from a certificate authority.
Securing Plesk and the Mail Server With a Certificate From Let’s Encrypt
Let’s Encrypt is an open certificate authority providing free SSL/TLS certificates.
During Plesk installation, Plesk and the mail server are automatically secured with a free SSL/TLS certificate from Let’s Encrypt. If, for some reason, it did not happen, we recommend that you manually secure Plesk and the mail server with a Let’s Encrypt certificate.
To secure Plesk and the mail server with a certificate from Let’s Encrypt:
Make sure that the Let’s Encrypt extension is installed.
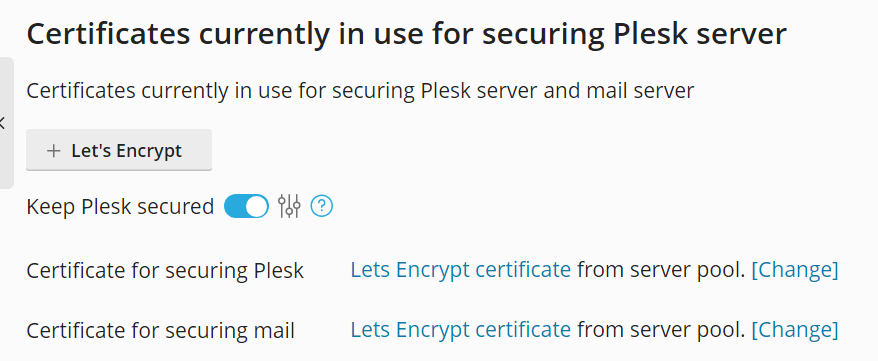
Go to Tools & Settings > SSL/TLS Certificates (under “Security”).
Click the + Let’s Encrypt button.
Make sure that the email address in the “Email address” field is correct. This email address will be used to send important notifications.
-
Click Reissue.
At this stage, the certificate from Let’s Encrypt has been generated and used to secure Plesk automatically.
To secure the mail server, click the [Change] link next to “Certificate for securing mail”.
Select the “Let’s Encrypt certificate (server pool)” from the drop-down list, and click OK.
Now both Plesk and the Plesk mail server are secured with the certificate from Let’s Encrypt.
Note
In Plesk for Linux, when Let’s Encrypt replaces the default self-signed certificate, in Tools & Settings > SSL/TLS Certificates the name of the certificate used to secure Plesk is changed to “Let’s Encrypt certificate”. In Plesk for Windows, the default certificate name is changed to “Let’s Encrypt certificate” only after you reload the Tools & Settings > SSL/TLS Certificates web page in the browser.
Note
Once you secure the mail server with an SSL/TLS certificate, make sure to access mail using:
The domain name of the Plesk server for which the certificate was issued (and advise your customers to do the same).
Mail for a domain that is secured with an individual SSL/TLS certificate.
Otherwise, the mail client software may be unable to verify the mail server identity, which may cause issues when sending or receiving mail.
Securing Plesk and the Mail Server With a Self-Signed Certificate
As we explained earlier, it is always preferable to use an SSL/TLS certificate from Let’s Encrypt or a paid SSL/TLS certificate from a different certificate authority. However, you may want to secure Plesk and the mail server with a self-signed SSL/TLS certificate, if, for example, the certificate issued by a certificate authority has expired.
To secure Plesk and the mail server with a self-signed certificate:
Go to Tools & Settings > SSL/TLS Certificates (under “Security”) and click the + Add button.
-
Fill in the fields marked with the asterisk. Pay particular attention to the following fields:
“Certificate name”. Give the certificate a recognizable name so you can tell it apart from other certificates in the server repository.
“Bits”. The more bits, the more secure the certificate. We recommend using the default value (4096).
“Domain name”. Make sure that the name in this field matches the server hostname.
If all the provided information is accurate, click Self-Signed. Plesk will generate a self-signed certificate and display it in “List of certificates in server pool”.
To secure Plesk, click the [Change] link next to “Certificate for securing Plesk”. Select the certificate generated during the previous step from the drop-down list, and then click OK.
To secure the mail server, repeat the previous step for “Certificate for securing mail”.