Implement List
Step 1. Implement actions in the controller.
When implementing a new page with a list on it, you need to specify two actions in the controller:
public function listAction()
{
    $list = $this->_getNumbersList();

    // List object for pm_View_Helper_RenderList
    $this->view->list = $list;
}

public function listDataAction()
{
    $list = $this->_getNumbersList();

    // Json data from pm_View_List_Simple
    $this->_helper->json($list->fetchData());
}
The first action defines the action itself and will have a view defined
in list.phtml. It loads the list and passes it to the view. The
second action defines the way the list can retrieve the data in JSON
format. This action is used when the user changes the sorting method in
the list, or proceeds to the next page (when there are, for example, 30
rows in the list and only 25 are displayed per page). In this case,
instead of reloading the whole page, only the list is reloaded using
AJAX request to the data action of the list.
Step 2. Implement the List object.
Now, it is time to implement the list itself. In order to to be correctly rendered in the view, it must be an instance of pm_View_List_Simple. We recommend implementing it as private method in the controller:
private function _getNumbersList()
{
    $data = [];
    $iconPath = pm_Context::getBaseUrl() . 'images/icon_16.gif';
    for ($index = 1; $index < 150; $index++)
    {
        $data[] = [
            'column-1' => '<a href="#">link #' . $index . '</a>',
            'column-2' => '<img src="' . $iconPath . '" /> image #' . $index,
        ];
    }

    $list = new pm_View_List_Simple($this->view, $this->_request);
    $list->setData($data);
    $list->setColumns([
        'column-1' => [
            'title' => 'Link',
            'noEscape' => true,
            'searchable' => true,
        ],
        'column-2' => [
            'title' => 'Description',
            'noEscape' => true,
            'sortable' => false,
        ],
    ]);

    // Take into account listDataAction corresponds to the URL /list-data/
    $list->setDataUrl(['action' => 'list-data']);
    return $list;
}
Pay attention to the
setDataUrl,
where we implicitly specify which action is used to retrieve data. Also,
we can implement the list as a separate class which extends the
pm_View_List_Simple.
In this case, the class is placed in plib/library, and the
controller will just create an instance of it. This makes it possible,
for example, to reuse the list in a different spot, or to create a
hierarchy of lists to reuse the implemented functionality. As an example
of such approach, you can refer to the implementation of the
list
and how it’s is called in
controller
(listAction and listDataAction methods).
Step 3. Define the view
When you implement the list using
pm_View_List_Simple,
the view (in a .phtml file) is very simple and uses the
pm_View_Helper_RenderList
helper to render it:
<?php echo $this->renderList($this->list); ?>
Now, you can visit the list action of your extension and check the result:
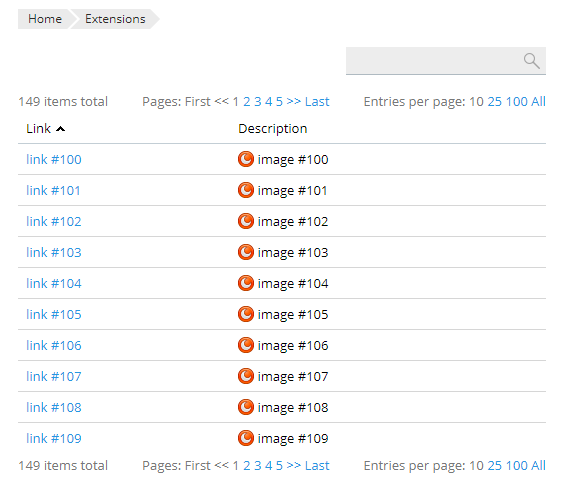
Moreover, you can see what the list would look like on a Plesk server using a different color scheme or branding (for example, when the Skins and Color Schemes extension is installed), or how the list would look in adaptive design on a mobile device.
Setting Default Column for Sorting
Starting with Plesk 12.5, it is possible to specify the default column for sorting via the options on creation of a pm_View_List_Simple class object.
$options = [
    'defaultSortField' => 'column-1',
    'defaultSortDirection' => pm_View_List_Simple::SORT_DIR_DOWN,
];

$list = new pm_View_List_Simple($this->view, $this->_request, $options);
$list->setData($data);
$list->setColumns([
    pm_View_List_Simple::COLUMN_SELECTION,
    'column-1' => [
        'title' => 'Link',
        'noEscape' => true,
       'searchable' => true,
    ],
    'column-2' => [
        'title' => 'Description',
        'noEscape' => true,
       'sortable' => false,
    ],
]);
Adding Toolbar to the List
Most lists in Plesk include a toolbar with buttons, and manipulating objects in the list using those buttons is a common user experience. Starting with Plesk 12.5, it is possible to implement group operations using SDK. You can define the buttons appearing on your list using the setTools method. The buttons can invoke several operations, such as navigating to a different page. The Add button is, probably, the one used most frequently. You can use helpers from pm_Context to compose the URL:
$list->setTools([
    [
        'title' => 'Button 1',
        'description' => 'Link to list of extensions',
        'link' => pm_Context::getModulesListUrl() ,
    ], [
        'title' => 'Button 2',
        'description' => 'Link to index page of the extension',
        'link' => pm_Context::getBaseUrl() ,
    ], [
        'title' => 'Button 3',
        'description' => 'Link to controller custom and action test of the extension',
        'controller' => 'custom',
        'action' => 'test',
    ],
]);
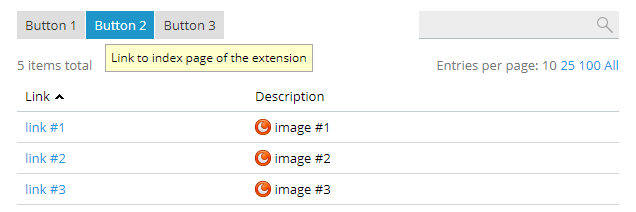
The buttons defined above will appear on the page like this:
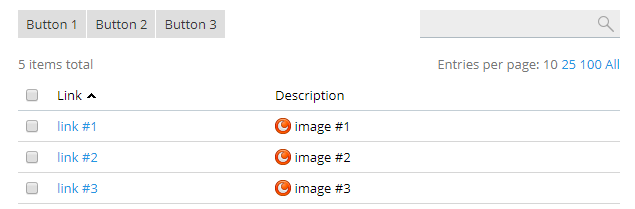
Another frequently encountered scenario is to implement a group operation with the selected objects. For this purpose, you need to add a column with checkboxes to the list:
$list->setColumns([
    pm_View_List_Simple::COLUMN_SELECTION,

    // all other columns
]);
And then add a button with the specified property
execGroupOperation:
$list->setTools([
    [
        'title' => 'Hide',
        'description' => 'Make selected rows invisible.',
        'execGroupOperation' => [
            'submitHandler' => 'function(url, ids) {
                $A(ids).each(function(id) {
                    $("' . $list->getId() . '")
                        .select("[name=\'listCheckbox[]\'][value=\'" + id.value + "\']")
                        .first()
                        .up("tr")
                        .hide();
                });
            }'
        ],
    ], [
        'title' => 'Remove',
        'description' => 'Remove selected rows.',
        'execGroupOperation' => $this->_helper->url('remove') ,
    ],
]);
For the case where you specify the URL of a controller and the action that is to process the group operation, implement the action in the controller:
public function removeAction()
{
    $messages = [];
    foreach((array)$this->_getParam('ids') as $id) {

        // Here we should remove the object with id = $id

        $messages[] = ['status' => 'info', 'content' => "Row #$id was successfully removed."];
    }
    $this->_helper->json(['status' => 'success', 'statusMessages' => $messages]);
}
Pay attention that processing of group operation is also made by AJAX request the same as changing ordering described above. So the action should respond with JSON.
More code samples are available as part of this example extension: https://github.com/plesk/ext-example/blob/master/plib/controllers/IndexController.php